

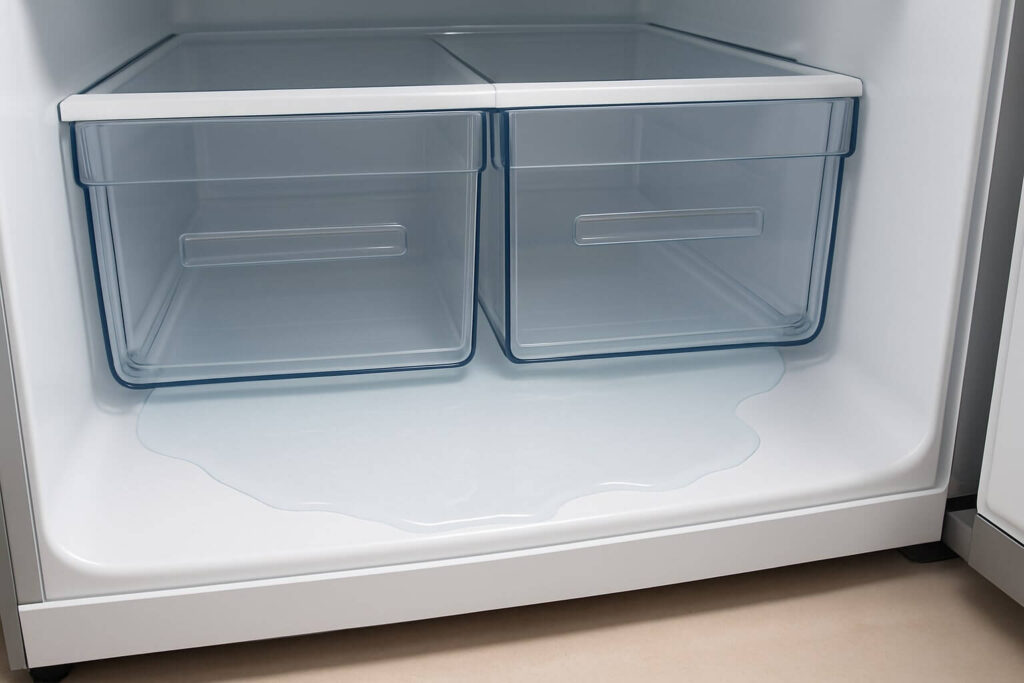
It is a frustrating, sinking feeling. You open your refrigerator to grab a snack, and you see it—a gross puddle of water inside your refrigerator, collected right at the bottom.
That pool of standing water under your crisper drawers is one of the most common and annoying problems a homeowner can face. Your first thoughts are likely “Is this dangerous? Is this a Freon leak? Is my fridge dying?”
Take a deep breath. We have good news.
You’re not looking at a $500 repair. This is not a broken compressor or a fatal Freon leak. In 95% of cases, you are looking at a simple clog that you can fix yourself in about 10 minutes with a tool you probably have in your kitchen right now.
As appliance experts, we see this problem every day. This ultimate guide will walk you through exactly what’s wrong, how to find the problem (even if it’s hidden), and how to unclog your refrigerator drain tube for good. Let’s save you a $150 service call.
💡 Mentor’s Diagnostic Hub
Leaking water is often a symptom of a larger plumbing or ice maker issue. This specific fix is part of our comprehensive master guide. Learn how to accurately diagnose every water line and sealed system component.
The 3 Most Common Causes of Water Under Your Crisper Drawers
While several things can cause a leak, they all lead to that same puddle. Here’s what’s most likely happening.
Cause #1: A Clogged Defrost Drain Tube (The 95% Culprit)
This is the problem 19 times out of 20.
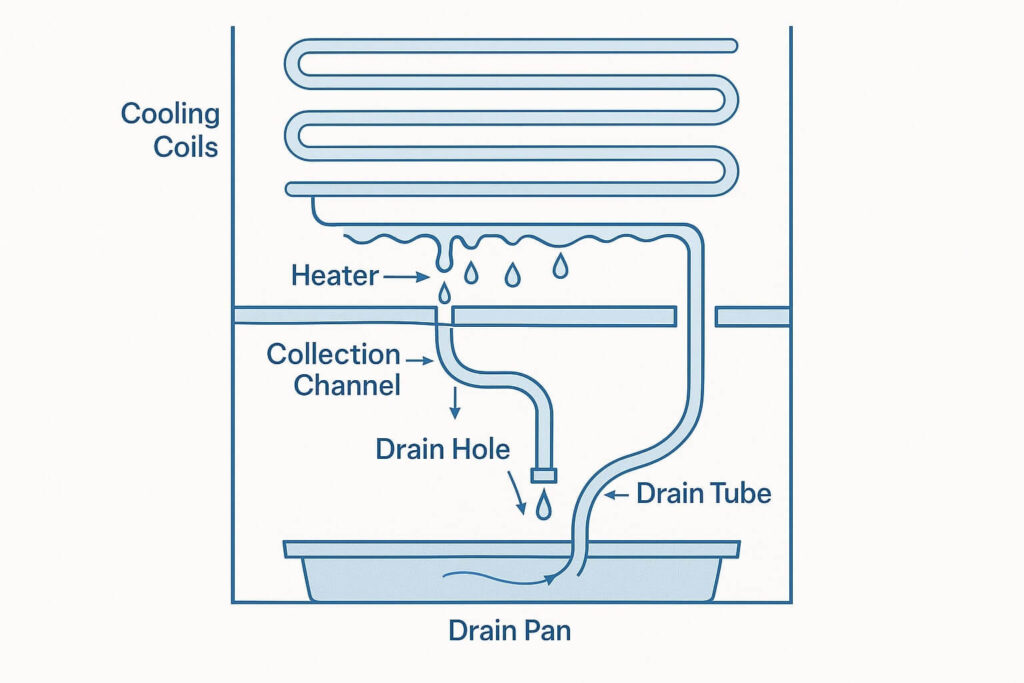
Every “frost-free” refrigerator has to defrost itself to prevent ice buildup. A few times a day, a small heater melts the frost off the cooling coils. This melted water (condensate) needs somewhere to go.
It’s designed to flow like this:
- Water drips into a small collection channel.
- This channel funnels the water into a tiny drain hole.
- The water flows down a drain tube through the back of the fridge.
- It empties into a drain pan underneath your fridge, where the heat from the compressor evaporates it.
The “puddle” happens when that tiny drain hole gets clogged with ice, mold, or tiny food particles. This ice buildup can happen on its own, or it can be a sign of a bigger cooling problem. For example, if your compressor is failing (often indicated by a refrigerator making a clicking noise), it can cause excessive frost that overwhelms the drain. With nowhere to go, the water overflows.
Cause #2: Your Refrigerator Is Not Leveled Correctly
This is a less common but tricky cause. Your refrigerator is not designed to be perfectly level. It’s actually supposed to tilt slightly backward.
This slight backward tilt uses gravity to make the doors swing shut and, more importantly, to encourage the defrost water to flow toward the drain hole in the back. If your fridge is tilted forward, even a tiny bit, water can pool at the front of the collection channel and spill over before it ever reaches the drain.
Cause #3: A Cracked or Leaking Water Filter
If your fridge has an internal water filter, a rare but possible cause is a bad filter. A crack in the filter housing, a bad O-ring, or a filter that wasn’t installed correctly can cause a slow drip. However, this water is usually cleaner and the problem starts immediately after changing the filter.
The Simple Fix: How to Unclog Your Refrigerator Drain Tube
Let’s fix the 95% problem first. This is the simple “DIY” fix that will solve most issues.
Tools You’ll Need
- A few old towels
- A turkey baster (this is the magic tool)
- A small funnel (optional)
- Hot, but not boiling, water
- Distilled white vinegar (optional, for killing mold)
- A flexible pipe cleaner or a zip-tie (optional, for tough clogs)
Step 1: Unplug and Find the Drain Hole
Warning: Always unplug your refrigerator from the wall before doing any cleaning or maintenance.
This is the hardest part for most people. The drain hole can be in one of two places, depending on your model.
- If the Drain is in the Refrigerator: On many top-freezer or side-by-side models (like Whirlpool or Maytag), the drain is in the fresh food compartment. Remove your crisper drawers. Look at the very back, bottom wall. You should see a small hole, often in a V-shaped channel. This is your target.
- If the Drain is in the Freezer: On many bottom-freezer or French door models (like Samsung, LG, GE), the drain hole is inside the freezer. You will need to empty the freezer and remove the floor panel (usually 2-4 screws). Underneath this panel, you will see the silver cooling coils and, right beneath them, the drain hole. This is much more common if you are also seeing a sheet of ice on your freezer floor.
Step 2: Clear Any Obvious Blockage
Once you’ve found the hole, inspect it. You may see a chunk of ice, a pea, or some other gunk plugging it.
Gently poke a flexible pipe cleaner or a long zip-tie into the hole. Wiggle it around to break up the initial clog. Do NOT use a toothpick or a skewer; it can break off and make the problem worse. Do NOT use a wire coat hanger; you can puncture the tube.
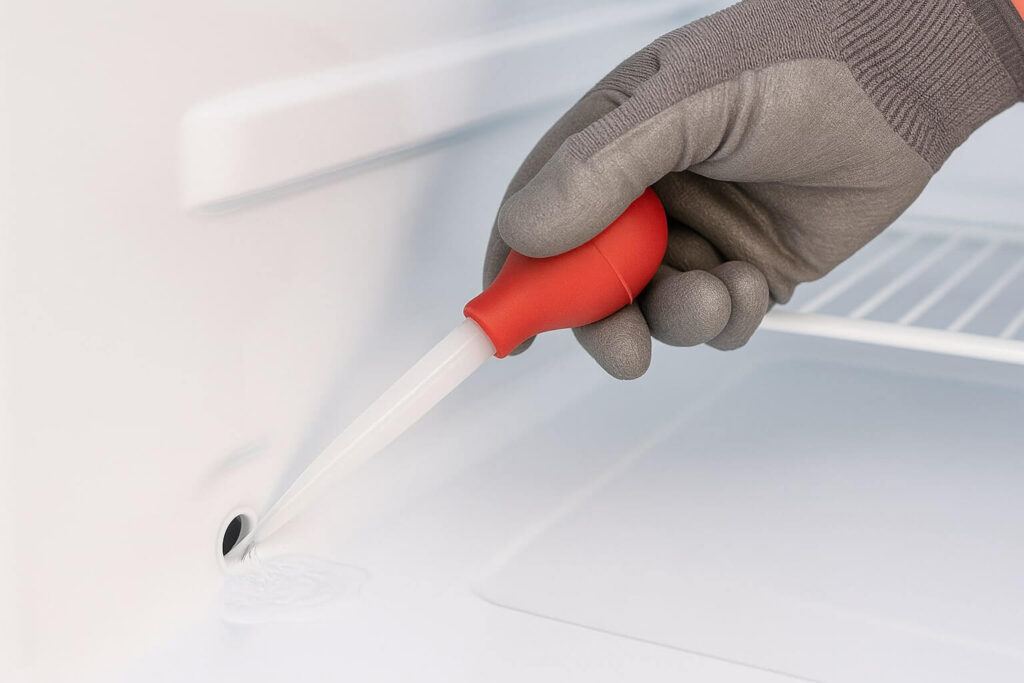
Step 3: Flush the Drain Tube (The “Turkey Baster” Fix)
This is the most important step.
- Fill your turkey baster with hot water.
- Press the tip of the turkey baster firmly against the drain hole, creating a good seal.
- Forcefully squirt the hot water down the drain. This combination of hot water and pressure will melt any ice and dislodge any gunk.
You may need to do this 3-4 times. You’ll know it’s clear when you hear the water successfully run all the way through, or when you push the water in and it doesn’t “rebound” back at you.
Step 4: (Optional) The Vinegar Flush
On your last flush, use a 50/50 mix of hot water and distilled white vinegar. This will help kill any mold or algae that caused the clog in the first place, preventing it from happening again next month.
Step 5: Clean Up and Test
Before you put everything back, pour one final cup of clean, room-temperature water into the drain channel. If it flows away easily, you have solved the problem. Dry the area, replace your shelves and drawers, and plug your refrigerator back in.
The Advanced Fix: What If the Clog is at the Bottom?
If the water still won’t go down, the clog isn’t at the top. It’s at the very bottom. The drain tube doesn’t just empty into the pan; it has a small rubber “duckbill” valve to stop insects from crawling up. This valve gets clogged with dust and gunk.
Step 1: Pull the Refrigerator Out
Unplug the fridge. If you have a water line, turn it off and disconnect it. Carefully pull the fridge away from the wall to access the back.
Step 2: Remove the Back Access Panel
At the bottom, you’ll see a 1-foot-high panel, usually made of cardboard or thin metal, held on by 4-8 screws (usually 1/4″ hex-head). Remove this panel.
Step 3: Locate the Drain Tube and Duckbill Valve
You will see the compressor and the black, dusty drain pan. Look for the small rubber tube that comes out from the fridge and dangles just above the pan. On the end of it is the duckbill valve.
Step 4: Clean the Valve
This is the gross part. The valve is probably clogged with a thick, black slime.
- Pull the rubber valve off the end of the tube.
- Take it to the sink and squeeze it. The “lips” will open.
- Clean it thoroughly with hot, soapy water and a Q-tip.
- (Pro Tip) Many technicians simply cut the “lips” off the end, leaving an open tube. This prevents it from ever clogging again, but in rare cases could let a bug in.
- Re-attach the clean valve and push the fridge back.
How to Prevent This Puddle from Ever Coming Back
- Do a Vinegar Flush (Twice a Year): Once every 6 months, flush the drain with a 50/50 hot water and vinegar solution before it has a chance to clog.
- Keep Food Away From the Back: Don’t push food (especially small items like peas or leafy greens) to the very back of the fridge. They can fall into the drain channel.
- Check Your Level: Use a level on top of the fridge. Make sure the bubble is slightly behind the center line (tilting back). Adjust the front feet if needed.
Frequently Asked Questions (FAQ)
Is the water under my crisper drawers dangerous?
Can I just use Drano or a chemical drain cleaner?
How much does it cost to have a pro fix this?
What if the water is leaking from outside the fridge?
Conclusion: Reclaim Your Fridge
A leaking refrigerator doesn’t have to mean a ruined weekend or a massive repair bill. Most internal leaks are caused by a simple drainage failure that you can solve with hot water and a bit of patience. By flushing the drain tube and cleaning the duckbill valve, you’ll stop the puddle for good and keep your appliance running efficiently.


