

You open your freezer, reach for some ice, and instead of a neatly contained bin, you find a mountain. The bin is overflowing, ice cubes are spilling out, and sometimes they’ve even fused into a solid block, creating an icy barrier in your freezer.
If your ice maker won’t stop making ice, it’s more than just a minor annoyance. An ice maker overflowing can quickly lead to freezer jams, dispenser motor failure, and eventually, a refrigerator leaking water on the floor.
This problem isn’t about making ice; it’s about knowing when to stop. In this master guide, we will troubleshoot every possible failure point, from the simple mechanical arms to the complex electronic solenoids located at the back of your appliance.
💡 Mentor’s Diagnostic Hub
Dealing with multiple cooling or ice issues? This specific fix is part of our comprehensive master guide. Learn how to diagnose every part of your appliance’s sealed system and water lines.
The Anatomy of the Stop Signal
To diagnose an overflowing bin, we must first look at how the appliance “sees” the ice level. There are three main ways a modern refrigerator stops ice production.
1. The Mechanical Shut-Off Arm (Bail Arm)
Found mostly in older Whirlpool, Kenmore, and Maytag models, this is a physical wire arm. As the ice level rises, it lifts the arm. Inside the ice maker head is a small microswitch. When that arm hits the top of its travel, the switch clicks, breaking the electrical circuit to the motor.
2. The Optical Infrared Sensor
Standard on Samsung and LG French Door models, these use a “Beam” system. One side of the freezer wall sends an infrared signal to the other. If the ice level blocks that light for more than a few seconds, the control board pauses the harvest cycle.
3. The Electronic Paddle
Common in GE and some newer Whirlpool models, this is a plastic paddle that “sweeps” across the bin before every harvest. If the paddle hits resistance (the ice), it retreats and tells the computer the bin is full.
The “Ice Bridge” and Mechanical Failures
If you have a mechanical arm, the most common reason for an ice maker overflowing is a physical jam. This often happens because of a phenomenon known as “bridging.”
Bridging occurs when the freezer temperature fluctuates. The top layer of ice in the bin can melt slightly, then refreezes, creating a hard “shelf” of ice. The feeler arm can get pinned underneath this shelf. Because the arm is stuck in the “down” position, the ice maker thinks the bin is empty and keeps dumping ice on top of the bridge until the entire freezer is a block of ice.
Advanced Mechanical Fixes:
- Microswitch Testing: If the arm moves freely but the ice won’t stop, the internal microswitch is likely shorted out. You can test this with a multimeter. With the arm in the “UP” position, there should be infinite resistance (Ohm reading). If it shows continuity while the arm is up, the switch is broken.
- Spring Tension: Some arms use a small tension spring to pull the arm down. If this spring snaps, the arm might “float” in the middle, never reaching the high point needed to trigger the shut-off.
Optical Sensor Glitches: The Samsung and LG Problem
If your fridge uses sensors, the “overflow” isn’t usually mechanical—it’s optical interference. Infrared sensors are easily fooled by two things: **Frost** and **Static.**
The “Ghosting” Effect
If your freezer door seal (gasket) has even a tiny tear, warm humid air enters and creates a thin film of frost over the sensor lenses. This frost can refract the infrared light. In some cases, it “tricks” the sensor into thinking the beam is still clear, even when ice is blocking it. In other cases, it creates a constant “full” signal. If your bin is overflowing, the sensor is likely failing to “see” the obstruction.
How to Recalibrate Sensors:
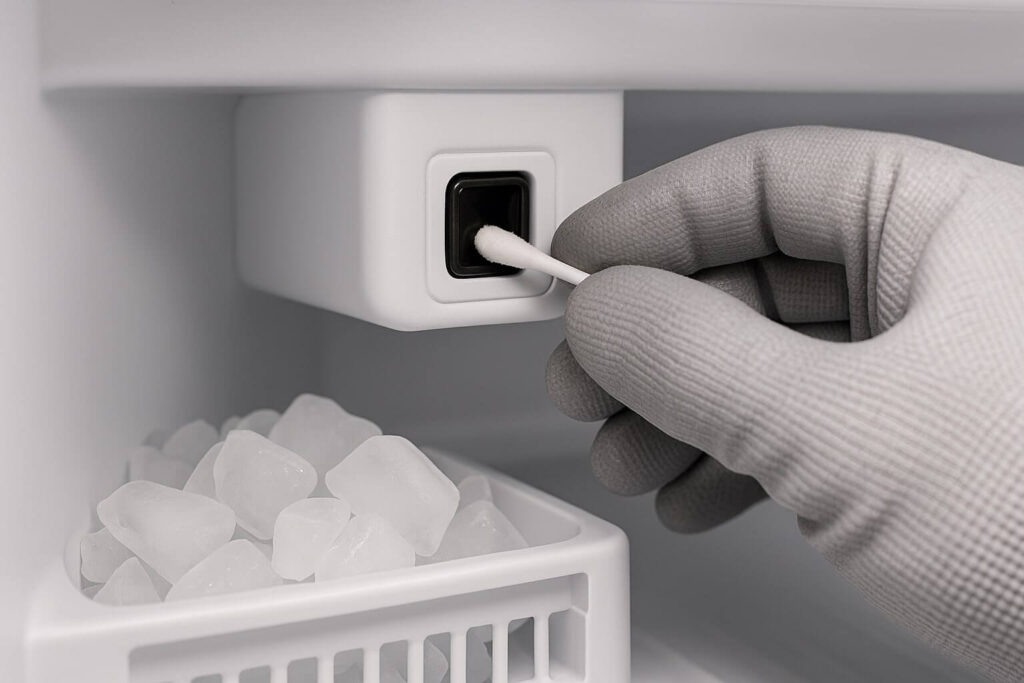
- Deep Clean the Lenses: Use a cloth dipped in warm water (no soap) to wipe the sensor eyes.
- The Smartphone Test: Turn on your phone’s front-facing camera and point it at the “emitter” sensor. Most phone cameras can see the infrared pulse. If you see a blinking purple light, the emitter is working. If not, the board needs replacement.
- Level the Fridge: If the refrigerator is leaning too far to one side, the ice bin may sit at an angle, causing the infrared beam to shoot past the top of the ice pile.
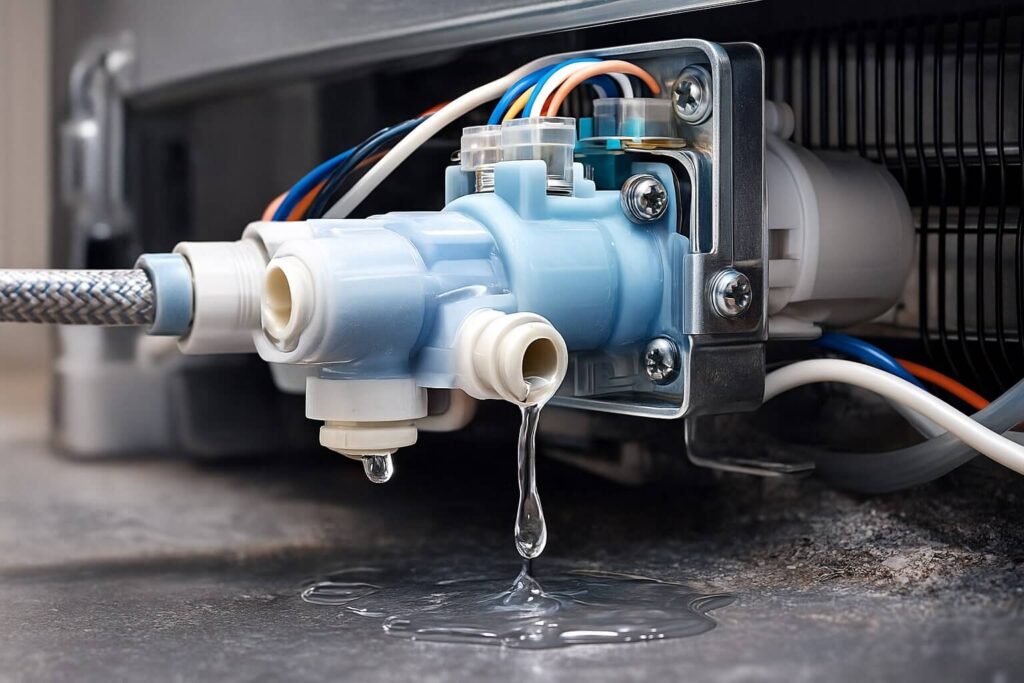
The Secret Culprit: Stuck-Open Water Inlet Valves
This is the most dangerous failure. Every other problem we’ve discussed involves the motor running too much. This problem involves water flowing even when the motor is off.
Inside the water inlet valve, there is a rubber diaphragm and a spring. Over 5 to 10 years, calcium and mineral deposits (hard water) build up on that rubber seal. Eventually, the seal can’t close perfectly. Even a tiny “weep” of water will eventually fill the ice mold, overflow into the bin, and create a frozen waterfall.
The 5-Minute Valve Test:
If you suspect the valve is stuck open, perform this test:
- Lift the feeler arm to the OFF position (or turn the ice maker off via the screen).
- Wait 2 hours.
- Check the ice mold. If it is full of water or there is a fresh icicle hanging from the fill tube while the unit is OFF, your water inlet valve is mechanically failed and must be replaced immediately to prevent home water damage.
Water Pressure and the “Snap-Back” Effect
Many homeowners are surprised to learn that low water pressure causes more overflows than high pressure. These valves are “Power-to-Open, Spring-to-Close.” They rely on the water pressure itself to help push the diaphragm shut.
If your household water pressure is below 20 psi (often caused by a clogged water filter or a faulty “Saddle Valve” on your home’s copper pipes), the spring doesn’t have enough help to snap the valve shut. The valve stays “half-open,” trickling water into your freezer 24/7.
Pro Tip: If your water dispenser is slow AND your ice maker is overflowing, **replace your filter immediately.**
Replacing the Ice Maker: A Step-by-Step DIY Guide
If the sensors are clean and the valve isn’t leaking, the internal timing motor or the control board of the ice maker has failed. Replacing the entire ice maker assembly is usually easier and cheaper than trying to fix individual gears.
Required Tools:
- 1/4 inch nut driver or Phillips screwdriver
- Putty knife (for popping plastic clips)
The Process:
- Power Down: Unplug the refrigerator. Do not skip this; the ice maker uses 120V AC current.
- Remove the Bin: Clear the ice and set the bin aside.
- Loosen Mounting Screws: Usually, there are two screws at the top holding the unit to the freezer wall. Loosen them (you usually don’t need to remove them fully).
- Disconnect the Wiring: Press the plastic tab on the wiring harness and pull.
- Install New Unit: Plug the new harness in, hang the unit on the screws, and tighten.
Why Your Kitchen Temperature Matters
In rare cases, the “overflow” is caused by your home’s environment. If the refrigerator is located in a garage or a very hot kitchen, the compressor runs constantly. This causes the evaporator coils to stay extremely cold. If the ice maker’s internal thermostat (the sensor that tells the motor to dump the ice) gets too cold too fast, it can “short-cycle.” It may try to harvest ice before the previous batch has fully cleared, causing a “log-jam” that eventually overflows the bin.
Troubleshooting by Symptom
To help you narrow down the specific cause, refer to this table. Matching your symptoms to the likely failure point can save you hours of unnecessary labor.
| Observed Symptom | Primary Suspect | Confidence Level |
|---|---|---|
| Ice cubes are fused into a solid block at the bottom. | Water Inlet Valve (Leaking) | High |
| Individual loose cubes are spilling onto the floor. | Feeler Arm or Optical Sensor | High |
| Water dispenser is slow AND bin is overflowing. | Clogged Water Filter | Medium |
| Ice maker clicks repeatedly but doesn’t dump. | Failed Ejector Motor | Low |
Frequently Asked Questions
Can I just bend the feeler arm to make it stop sooner?
Why does my ice maker only overflow at night?
Is there a reset button for an overflowing ice maker?
Conclusion: Restoring Order to Your Freezer
An ice maker that won’t stop making ice is a sign that the communication between your ice bin and your water valve has broken down. By methodically checking the mechanical arm, cleaning the infrared sensors, and ensuring your water inlet valve is snapping shut, you can prevent expensive water damage and reclaim your freezer space.
If these steps don’t work, don’t hesitate to replace the assembly. It’s a 15-minute fix that saves hours of chipping away at ice mountains later.


