

It is one of the modern kitchen’s biggest frustrations: you open the freezer bin for a cold drink, only to be met with an empty tray. When your ice maker is not making ice, it is easy to assume a costly repair is in your future.
But as appliance repair experts, we can tell you a secret: 90% of the time, an ice maker not working is not a broken part. It is a simple clog, a sensor that has been tripped, or a setting that has been overlooked.
Whether you have a traditional ice maker inside your top-freezer or a complex in-door dispenser on a French door model, the troubleshooting steps are remarkably similar.
Before you even think about calling a technician, follow this 3-step check. We will walk you through everything from the 30-second fixes to the more advanced diagnostics. Let us get that satisfying “clunk” of dropping ice back in your life.
💡 Mentor’s Diagnostic Hub
Dealing with multiple cooling or ice issues? This specific fix is part of our comprehensive master guide. Learn how to diagnose every part of your appliance’s sealed system and water lines.
The 3-Step Triage: Easy Fixes to Try First
These three steps solve the vast majority of problems. Start here.
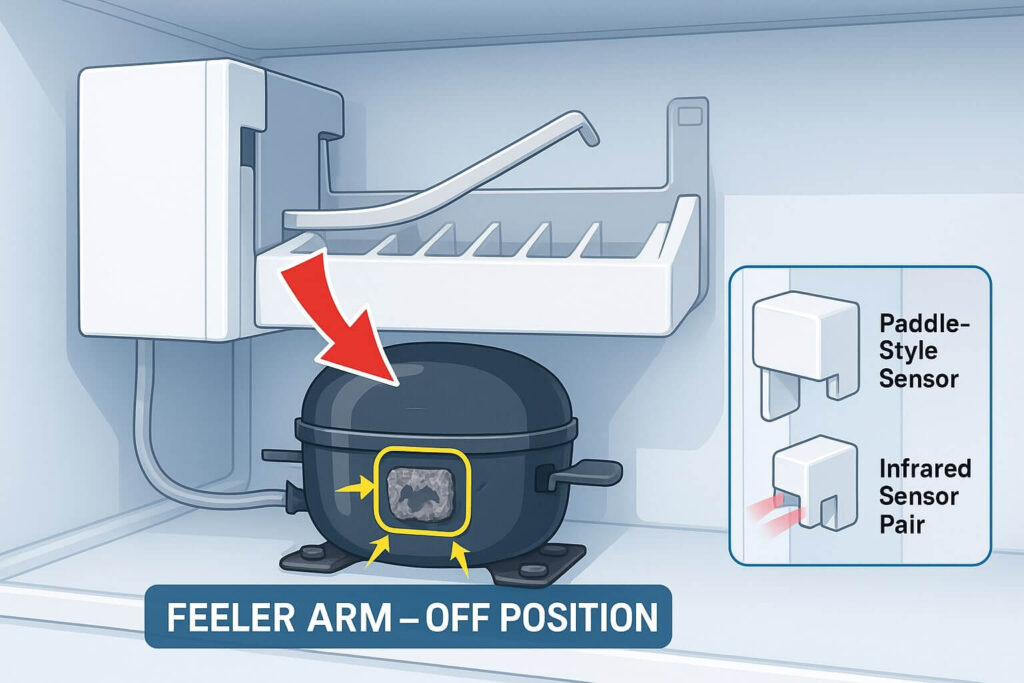
Step 1: Check the “On/Off” Mechanism (The Feeler Arm)
Every ice maker has a sensor to tell it when the bin is full. If this sensor is in the “off” or “full” position, your ice maker will not produce a single cube.
-
A) For Standard Ice Makers (Metal Arm): Most ice makers have a simple metal bar, called a feeler arm. When the ice level gets high, it lifts this arm, signaling the unit to stop.
-
The Fix: Look inside your freezer. If this metal arm is locked in the UP position (like a lever being pulled up), it’s in the “off” position. It can get knocked by a bag of frozen vegetables or an ice cube. Firmly push the arm all the way down into the “on” position.
-
-
B) For Modern Ice Makers (Paddle or Sensor): Newer models may have a white plastic “paddle” that does the same job. Others (especially Samsung and LG) use an infrared (IR) sensor.
-
The Fix: If you have a paddle, make sure it’s not jammed by an ice chunk. If you have an IR sensor, make sure nothing is blocking the beam between the two sensors on either side of the ice maker. Sometimes, a piece of ice or frost buildup can block it, tricking the machine into thinking the bin is full.
-
Step 2: Investigate the Water Supply (The #1 Culprit)
This is, without a doubt, the most common reason for an ice maker to fail. No water in means no ice out. Therefore, the problem can be in one of three places.
-
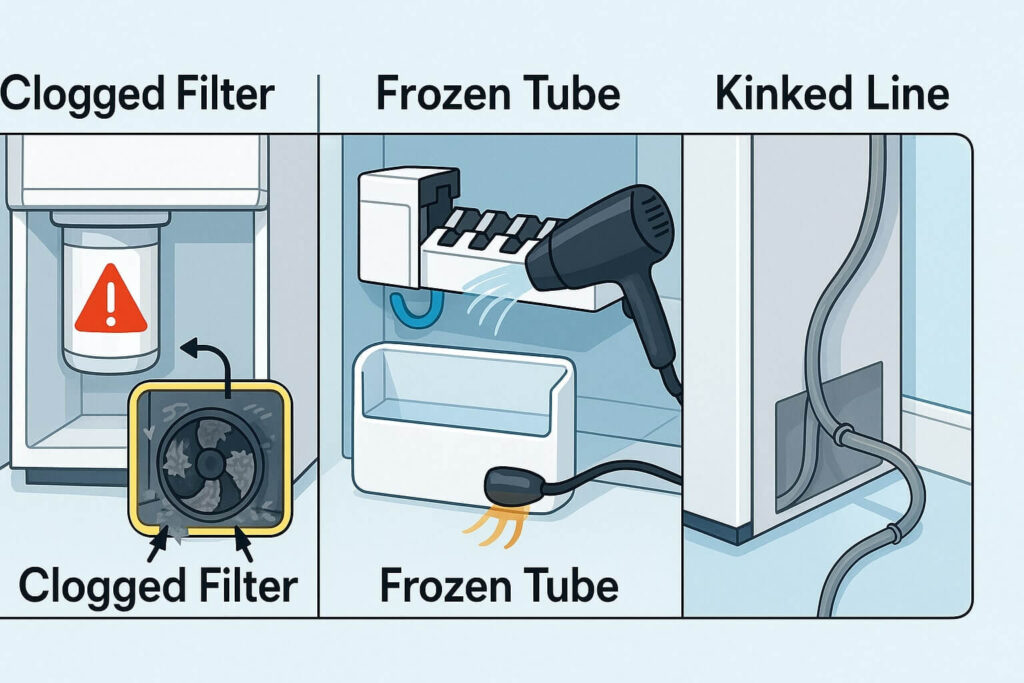
A) The Water Filter (The Easiest Fix): Your refrigerator’s water filter (the one for the dispenser and ice maker) gets clogged with sediment over time. When it gets too clogged, water pressure drops to a trickle—enough for the water dispenser, but not enough to fill the ice mold in the few seconds the valve is open.
-
The Fix: Is your “Change Filter” light on? Even if it’s not, if the filter is older than 6 months, replace it. This is the single most effective fix for an ice maker that’s making small, hollow, or no ice.
-
-
B) The Water Line Inside the Freezer (Frozen Blockage): Look for the small, 1/4-inch water line that runs into the back of your ice maker. Because it’s inside the freezer, it’s common for a drop of water to freeze right at the spout, creating a tiny ice dam.
-
The Fix: Do NOT use a sharp object to chip the ice; you will puncture the line. Instead, take a hairdryer on a low heat setting and gently wave it over the frozen line and fill spout for 2-3 minutes until the blockage melts.
-
-
C) The Water Line Behind the Refrigerator (Kinks & Valves): Carefully pull your refrigerator away from the wall. Look at the water line that runs from your wall to the back of the fridge.
-
The Fix 1 (Kink): Is the plastic or copper line kinked like a bent straw? Straighten it out immediately. This is a very common issue after pushing a fridge back into place.
-
The Fix 2 (Valve): Find the saddle valve (the small valve that connects the water line to your main home plumbing). Is the valve turned all the way on? Turn it counter-clockwise to ensure it’s fully open.
-
Step 3: Force a Reset (The Reboot)
If the arm is down and the water is flowing, the ice maker’s internal motor or computer might just be “stuck” in a cycle, often after a brief power outage. You need to know how to reset your ice maker.
-
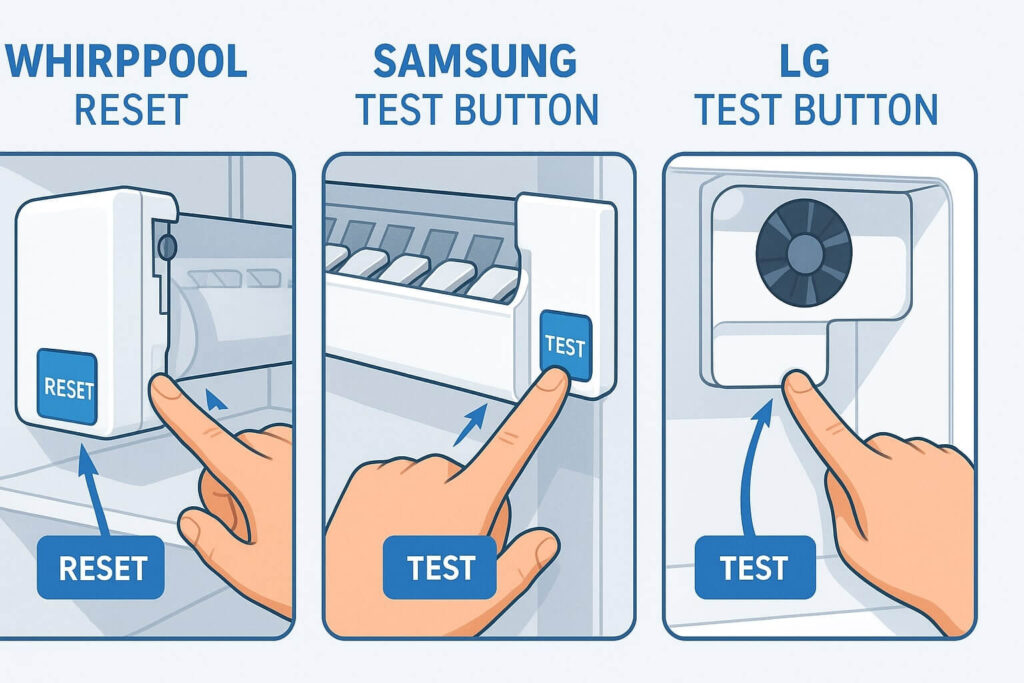
For Standard/Whirlpool Models: Look on the front or bottom of the ice maker motor (the white box). You may see a small pinhole or a test button labeled “Reset.” Press and hold it for 5-10 seconds. You may also see an On/Off switch—flip it off, wait 1 minute, and flip it back on.
-
How to Reset a Samsung Ice Maker: Most Samsung models have a rectangular “Test” button, often on the bottom or side of the ice maker unit. Press and hold this button until you hear a chime or the ice maker begins to move (about 3-5 seconds). This forces it to run a harvest cycle.
-
How to Reset an LG Ice Maker: Similar to Samsung, LG models have a small “Test” button on the bottom of the unit. Press and hold it for 3 seconds. The ice maker will twist and attempt to fill with water. This also helps clear “Er IF” (Ice Fan) error codes.
After any reset, BE PATIENT. It can take 2-4 hours for the first batch of ice to be made and drop.
Advanced Troubleshooting: When the 3-Step Check Fails
If you’ve done the 3 steps and your ice maker is still not working after 24 hours, you likely have a specific fault. Let’s diagnose it by the symptom.
Is your freezer warm AND the ice maker dead?
- The Problem: Before you blame the ice maker, check the freezer’s temperature. Your ice maker has an internal thermostat and will not cycle if the freezer is too warm (e.g., above 10°F / -12°C). The problem isn’t your ice maker; it’s your refrigerator’s main cooling system.
- The Fix: Listen to your fridge. If you hear a repetitive refrigerator making a clicking noise every few minutes, it’s the classic sign your compressor is failing to start. You will need to diagnose and fix this main cooling problem before your ice maker will ever work again.
What if the ice is small, hollow, or misshapen?
-
The Problem: This is a classic low water pressure issue.
-
The Fix: This is 99% a clogged water filter. The valve isn’t open long enough to fill the mold. Replace your water filter, even if the light isn’t on. If that doesn’t fix it, check for a kink in the line behind the fridge.
What if the ice maker is stuck or jammed?
-
The Problem: An ice cube is jammed in the ejector mechanism. The gears are stuck.
-
The Fix: Turn the ice maker off (feeler arm up or off switch). Use a plastic utensil (like a spatula) and a bit of warm water to gently chip away or melt the jammed cube. Do not force the gears, or you will strip them. Once clear, turn it back on.
What if the ice maker won’t stop making ice?
-
The Problem: Your “off” switch has failed.
-
The Fix: The feeler arm or IR sensor is broken and isn’t sensing the ice level. The arm may be detached, or the sensor is faulty. This usually requires replacing the ice maker motor head or the full ice maker assembly.
When to Call a Pro: The 3 Parts That Fail
If you’ve tried everything, you almost certainly have a single failed part. These are the three components that break and will require a technician or a DIY replacement.
-
The Water Inlet Valve: This is the small part on the back of your fridge where the water line connects. It’s an electronic (solenoid) valve that opens and closes to let water in. If this valve fails, no water ever gets to the ice maker.
-
The Ice Maker Motor (The Assembly): This is the main “box” of your ice maker. It contains the motor, gears, and sensors. When this fails, the ice maker is completely dead—it won’t cycle, won’t fill, and won’t respond to a reset.
-
The Main Control Board: This is the “brain” of the refrigerator. If this fails, it’s not sending the signal to the ice maker to start. This is rare, but it’s the most expensive fix.
Frequently Asked Questions (FAQ)
How long does it take for an ice maker to make ice after a reset?
Do I really need to change my water filter every 6 months?
My ice maker stopped working right after a power outage. What’s wrong?
Is it cheaper to fix my ice maker or buy a new refrigerator?
Conclusion: Don’t Give Up on Your Ice Maker
A non-working ice maker is a solvable problem. Don’t resign yourself to filling ice cube trays for the rest of your fridge’s life.
Start with the simple 3-step check:
- First, verify the Feeler Arm is ON.
- Second, investigate the Water Supply to see if it’s CLOGGED.
- Finally, perform a Reset to see if it needs a REBOOT.
Most ice maker issues are simple water restrictions or sensor glitches. By methodically checking the filter, the water lines, and the reset button, you can save yourself the cost of a service call and get your ice production flowing again.


