

If your Whirlpool or GE refrigerator is making a loud humming noise but absolutely refusing to start, learning how to test refrigerator capacitor components is the single most important diagnostic step you can take. Often, frustrated homeowners immediately blame the compressor or the main control board. However, the real culprit is frequently the small, inexpensive “battery” that gives the compressor its initial kick.
This small cylindrical part acts exactly like a turbo boost for your heavy compressor motor. Unfortunately, if this vital component fails, the compressor stalls, overheats, and your expensive food spoils rapidly. In this comprehensive master guide, we will troubleshoot specific whirlpool fridge capacitor symptoms and perform the definitive ge refrigerator start relay test.
Furthermore, we will show you exactly how to safely discharge the lethal stored electricity inside the capacitor. This is a crucial safety step. Finally, we will teach you how to use a digital multimeter to definitively verify if the part is dead or functioning perfectly.
💡 Mentor’s Diagnostic Hub
Compressor starting components represent the most common failure points in modern refrigeration. This capacitor testing guide serves as a critical pillar in our comprehensive series on diagnosing clicking noises, warm cabins, and electrical failures.
Understanding the Part Before You Learn How to Test Refrigerator Capacitor
You must thoroughly understand the basic physics of an electric motor before you begin testing parts. Your refrigerator’s compressor operates as a heavy-duty, sealed mechanical pump. Just like a car engine requires a dedicated starter motor to turn over, a compressor needs a massive, instantaneous surge of electrical torque to start spinning against high chemical pressure.
The Physics of the Boost
The Capacitor actively stores a highly concentrated electrical charge. When your digital thermostat calls for cooling, the relay closes the circuit. Instantly, the capacitor releases its stored energy in a split-second, massive burst. This extra jolt feeds directly into the copper motor windings. Consequently, it forces the heavy piston to start moving against the trapped Freon gas.
Start Capacitor vs. Run Capacitor
Before you blindly use our guide on how to test refrigerator capacitor units, you must properly identify which specific type your appliance utilizes. Manufacturers use two distinctly different components.
- Start Capacitor (Usually Black): This part stays in the active electrical circuit for only a fraction of a second. It possesses a very high microfarad rating (typically 100+ MFD). It provides raw starting torque.
- Run Capacitor (Usually White or Silver): This part stays in the active circuit 100% of the time while the compressor runs. It features a much lower rating (typically 10 to 20 MFD). It continuously smooths out the electrical current to improve motor efficiency.
Common Whirlpool Fridge Capacitor Symptoms
Capacitors rarely fail quietly or invisibly. Instead, they usually give off highly distinct warning signs weeks before they die completely. If you actively notice these specific issues, do not wait for the fridge to stop cooling entirely. Proactive replacement saves the expensive compressor from thermal damage.
1. The “Hard Start” (Dimming Kitchen Lights)
Does your overhead kitchen light flicker or significantly dim every single time the fridge turns on? This classic symptom indicates a “hard start.” Essentially, the heavy compressor is drawing massive, dangerous amounts of amperage from your wall outlet. It draws this excessive power because the dead capacitor isn’t providing its usual helpful boost.
2. The “Click-Hum-Click” Cycle
This represents the absolute most common sound of a catastrophic start failure. First, you hear a sharp click. Next, the motor hums aggressively for about five seconds as it desperately tries to spin. Finally, it fails, and the Thermal Overload Protector clicks loudly to cut the power. Consequently, the fridge remains warm.
3. Excessive Heat Generation
A failing run capacitor forces the compressor motor to work incredibly hard. As a result, the black metal casing of the compressor will become dangerously hot to the touch. If you cannot comfortably hold your hand on the compressor tank for three seconds, the electrical efficiency has plummeted.
SAFETY WARNING: Discharge Before You Test Refrigerator Capacitor
STOP. You must read this entire section twice before touching your appliance.
Engineers design a capacitor specifically to store high-voltage electricity for long periods. Therefore, touching the two exposed metal terminals with your bare fingers can result in a severe, painful electrical shock. This lethal danger remains even if you have completely unplugged the refrigerator from the wall.
How to Safely Discharge the Stored Energy
- First: Unplug the heavy refrigerator directly from the wall outlet. Never rely solely on turning the digital display off.
- Second: Acquire a properly insulated tool. You must use a heavy-duty screwdriver featuring a thick plastic or solid rubber handle.
- Third: Carefully touch the bare metal shaft of the screwdriver across both metal terminals of the capacitor simultaneously. You must physically bridge the gap between the two prongs.
- Finally: Listen closely. You might hear a sharp “pop” or clearly see a small blue spark. This is the dangerous stored energy safely releasing into the metal screwdriver shaft instead of your body.
⚠️ Required Safety Gear:
Heavy-Duty Insulated Screwdriver Set
Why you need this: Standard cheap screwdrivers can allow high voltage to travel into your hand. Properly insulated tools are mandatory for safe capacitor discharging.
Tools You Will Need for the Diagnostic Test
To perform this specific electrical test accurately, you simply cannot guess. You absolutely need precise diagnostic tools to measure internal chemical degradation.
- Digital Multimeter: You must possess a meter featuring a dedicated “Capacitance” measuring mode (usually denoted by MFD, µF, or a specific capacitor symbol).
- Needle-Nose Pliers: You need these to safely pull the tight wire connectors off the metal spade terminals.
- Magnetic Nut Driver: You need a 1/4-inch driver to cleanly remove the rear sheet metal access panel.
🛠️ Essential Testing Tool:
Digital Multimeter with Capacitance Mode
Why you need this: Standard cheap multimeters only test resistance. You must have a meter capable of reading Microfarads (MFD) to definitively prove a capacitor is healthy.
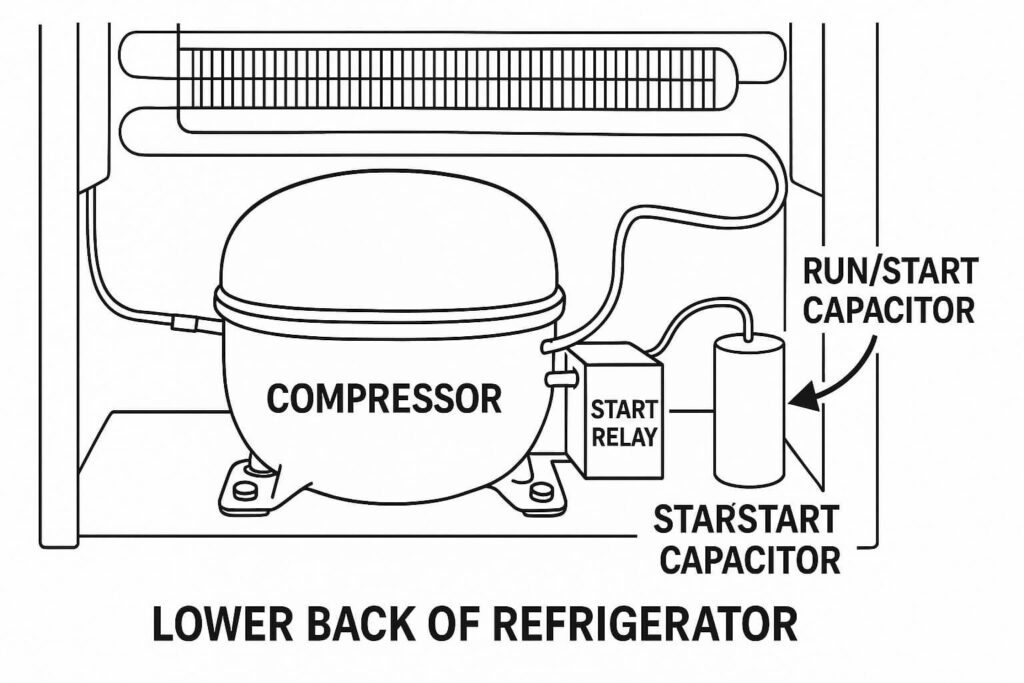
Step 1: Locate the Part to Test Refrigerator Capacitor
For most standard Whirlpool and GE models, the engineers locate the capacitor directly next to the heavy compressor at the bottom rear of the fridge.
The Disassembly Process
- First, carefully pull the heavy fridge away from the wall. Next, use your nut driver to remove the lower back cardboard or metal access panel.
- Then, locate the Start Relay. This looks like a small plastic box plugged directly into the side of the large black compressor tank.
- Whirlpool Style: Look closely for a white, oval-shaped plastic part clipped directly onto the side of the relay block.
- GE Style: Look for a white or silver metal cylinder mounted separately onto the metal cabinet floor, attached by two trailing wires.
- Finally, remove the part. Use your needle-nose pliers to firmly disconnect the wire terminals. Crucially, pull by the metal connector base, never by the thin wire itself!
Step 2: Visual Inspection of the Component
Before you actively learn how to test refrigerator capacitor internals with a meter, you must look closely at the physical outside of the part. Catastrophic failures leave highly obvious visual evidence.
Signs of Physical Destruction
- Severe Bulging: Look at the flat top of the cylinder. Is the plastic domed, swollen, or cracked open like a burst soda can?
- Chemical Leaking: Capacitors contain special dielectric fluid. Do you see a sticky, oily residue leaking down the sides of the casing?
- Burnt Terminals: Inspect the metal connection prongs. Are they heavily blackened, melted, or physically wiggling loose?
The Verdict: If you clearly see any of these physical symptoms, you do not even need to use your multimeter. The capacitor is completely destroyed. You must replace it immediately before restoring power.
Step 3: Guide on How to Test Refrigerator Capacitor with Multimeter
If the capacitor looks physically perfect on the outside, you must test its internal chemistry. The absolute most accurate way to verify health is by using the dedicated “Capacitance” mode on your digital meter (often indicated by the symbol: -||-).
How to Read the Data Label
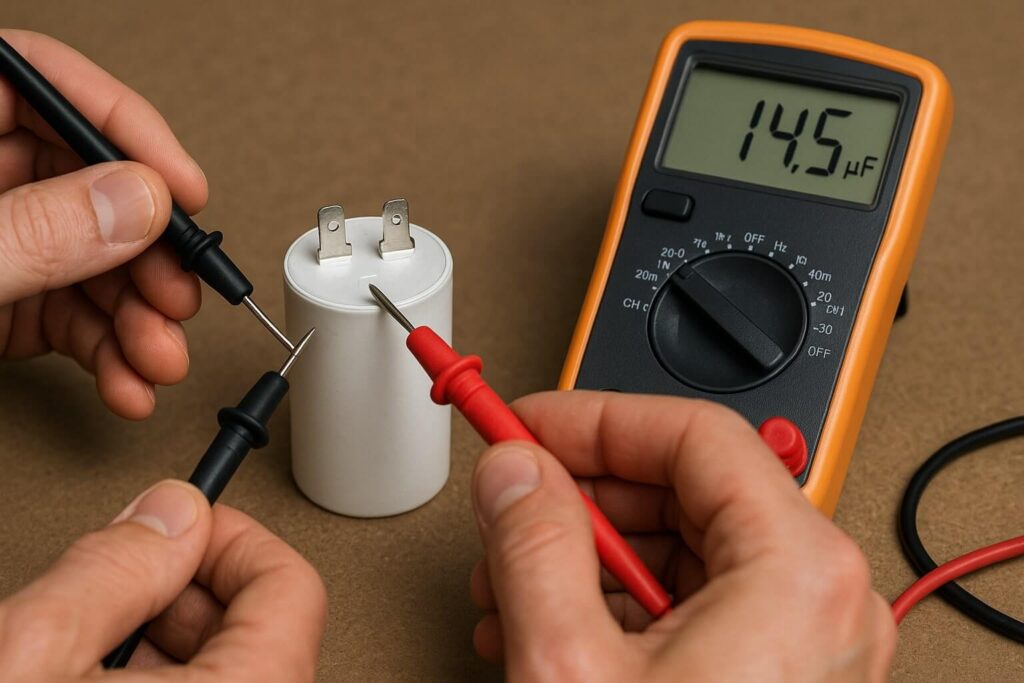
First, you must know what target number you are looking for. Look closely at the printed label on the side of the capacitor. You will see a specific rating, such as “12 MFD” or “15 µF”. Additionally, you will see a tolerance rating, typically “+/- 5%”. This means a healthy 15 MFD capacitor can safely read anywhere between 14.25 and 15.75 on your meter screen.
The Meter Testing Procedure
- Set Your Meter: Turn the central dial to the Capacitor symbol or the dedicated MFD setting.
- Connect the Probes: Place the red probe firmly on the left metal terminal. Next, place the black probe firmly on the right metal terminal. (Polarity does not matter for appliance run capacitors).
- Wait for the Reading: The meter takes a few seconds to actively charge the component and calculate the capacity.
Analyzing the Final Results
- The Good Reading: The digital number matches the printed label rating (within the 5% tolerance window). Your part works perfectly.
- The Bad Reading: The number displays significantly lower than the label (e.g., reading 4 MFD on a 15 MFD part). The internal chemistry has dried out. The capacitor is dangerously weak.
- The Dead Reading: The meter instantly says “OL” (Open Loop) or “0.00”. The internal wiring has physically snapped. The part is entirely dead.
Step 4: The “Resistance Trick” (Alternative Method)
Perhaps your current meter lacks a fancy capacitance mode. Fortunately, you can still learn how to test refrigerator capacitor functionality using the standard Ohms (Ω) resistance setting. This method proves if the part can accept a charge, even if it cannot measure the exact volume.
Performing the Analog Charge Test
- Set Your Meter: Turn the dial to a relatively high Ohms setting (like 20kΩ or higher).
- Touch the Terminals: Place the metal probes firmly on the capacitor prongs.
- Watch the Screen Closely:
- The Good Reaction: The numbers should start low and rapidly climb higher and higher until hitting “OL” (Infinity). This specific reaction means the multimeter’s internal battery is actively charging the capacitor.
- The Bad Reaction: If the screen stays at “OL” instantly without climbing, the part is open. If it stays near “0” continuously, the part is internally shorted. Both reactions mean the capacitor is dead.
- Reverse and Repeat: Swap the red and black probes to the opposite terminals. The numbers should drop and then climb again.
Brand Specifics: Whirlpool vs. GE Diagnostics
While the fundamental testing physics remain identical across all appliances, the specific failure patterns differ greatly by brand architecture.
Whirlpool Fridge Capacitor Symptoms
Whirlpool fridges almost exclusively use a white “Run Capacitor” firmly attached directly to the start relay block. Interestingly, when these specific capacitors fail, the fridge might still occasionally run. However, the compressor will run extremely hot and draw heavy wattage. If you ever replace the start relay on a Whirlpool unit, you should always replace the attached capacitor simultaneously to ensure longevity.
GE Refrigerator Start Relay Test
Conversely, GE models commonly utilize a large standalone capacitor mounted to the floor. On older GE units, the Start Relay (the PTC ceramic component) actually fails much faster than the capacitor itself. Therefore, if your GE capacitor tests “Good” on your multimeter, you must perform a dedicated ge refrigerator start relay test.
How to Test the GE Relay: Pull the plastic relay off the compressor pins. Shake it violently next to your ear. If it loudly rattles like a child’s toy filled with broken glass, the internal ceramic disc has shattered. You must replace the relay.
Frequently Asked Questions (FAQ)
Can a refrigerator run without a capacitor?
Does polarity matter when installing a new refrigerator run capacitor?
How much does a replacement refrigerator capacitor cost?
What happens if I put a larger MFD capacitor on my refrigerator?
Conclusion: The Ultimate 5-Minute Diagnosis
In conclusion, knowing exactly how to test refrigerator capacitor with multimeter probes represents a fast, 5-minute diagnostic job. This specific skill completely separates the seasoned professionals from the amateur guessers. Ultimately, it allows you to definitively prove if a specific part is broken before you waste money ordering unneeded replacements.
If your diligent multimeter testing clearly shows the part is dead (reading OL or significantly Low MFD), a cheap replacement is usually all it takes to get that heavy compressor humming perfectly again.
🛠️ Recommended Fix:
Universal Refrigerator Capacitors and Relays
Why you need this: If your testing proves the part is dead, purchasing a universal kit ensures you have the exact match to restore cooling power instantly.
If the capacitor tests absolutely fine but the fridge continues to click aggressively, your Start Relay might actually be the true issue. Check out our comprehensive guide on how to test and replace the start relay for the next logical troubleshooting step.


