

Learning how to precisely install hard start kit components is often the absolute only way to save an LG or Kenmore Elite refrigerator that has suddenly stopped cooling. If you hear a loud “click-buzz-click” noise radiating from the lower back panel, your compressor is mechanically trying to start. However, it likely lacks the necessary momentum to spin against the internal gas pressure.
Before you hastily spend $800 on a professional repair technician or drop $2,000 on a brand new refrigerator, you have another option. There is a definitive “Hail Mary” repair that veteran appliance technicians have successfully used for decades to save aging appliances. Specifically, this miracle device is the Hard Start Kit (commonly referred to in the industry as a “3-in-1” relay).
This incredibly small, inexpensive device completely replaces your fridge’s aging start relay, the overload protector, and the run capacitor with a single, pre-wired, highly powerful unit. It actively provides the massive extra electrical torque needed to violently jolt a stuck or “tight” reciprocating compressor back to life. Consequently, this simple repair can potentially add years to your expensive appliance’s lifespan.
In this massive, highly comprehensive master guide, we will walk you through exactly how to install hard start kit wiring on an LG, Kenmore, Whirlpool, or GE fridge. We will thoroughly cover the critical difference between standard and linear compressors. Furthermore, we will teach you how to accurately map your specific compressor pins using a digital multimeter. Finally, we will outline the exact step-by-step installation process to guarantee your safety and success.
💡 Mentor’s Diagnostic Hub
Compressor starting components represent the most frequent failure points in modern refrigeration. This hard start installation guide serves as a critical action plan in our comprehensive master series on diagnosing clicking noises, warm cabins, and catastrophic electrical failures.
What Is a Hard Start Kit and Why Do You Need It?
To fully understand why you desperately need to install hard start kit devices, you first need to understand exactly how your refrigerator mechanically works. The heavy compressor essentially functions as a massive, sealed motor pump.
The Physics of Compressor Startup
Just like a car engine struggling to start in freezing winter weather, this heavy motor requires a massive momentary surge of electricity. This initial surge provides the extreme torque required to get the heavy internal piston spinning from a completely dead stop.
In a normal, factory-standard fridge, a highly delicate system manages this intense startup sequence. It uses three separate small components:
- The Start Relay (PTC): This small ceramic device routes high voltage to the start winding for just a split second.
- The Thermal Overload: This bimetallic safety switch protects the motor from violently burning out if the piston stalls.
- The Run Capacitor: This small battery continuously helps maintain electrical efficiency once the motor is actively running.
Why Factory Parts Fail
Over time, the mechanical piston inside your heavy compressor inevitably gets “tight” due to intense friction and internal metal wear. The cheap factory-installed relay simply doesn’t provide enough electrical “juice” to turn that tight piston over anymore. Consequently, the motor stalls, overheats, and clicks off.
When you choose to install hard start kit units, you actively replace those weak factory parts with a highly robust, unified system. This new kit includes a much larger internal start capacitor. Therefore, it delivers a massive “kick” of voltage—often providing 250% to 300% more starting torque. This intense power violently forces the stubborn compressor to start spinning again.
CRITICAL WARNING: Check This Before You Install Hard Start Kit
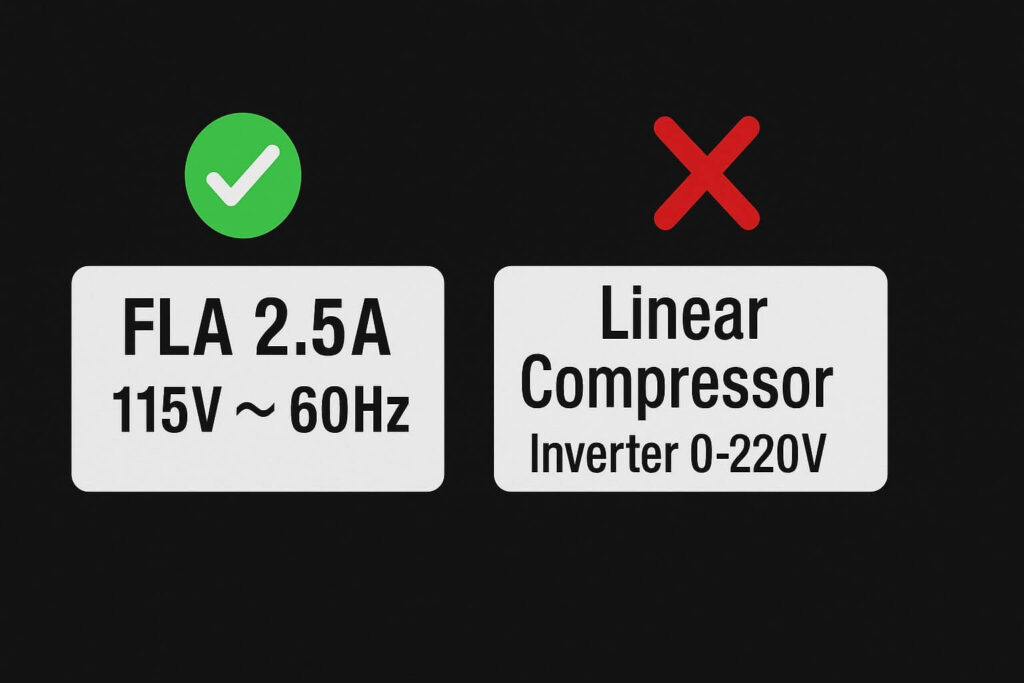
Stop right here. This is definitively the most important section of this entire comprehensive article. Before you hastily buy an LG refrigerator hard start kit online, you must verify exactly what type of compressor currently sits in the back of your specific machine.
LG and Kenmore Elite models utilize two distinctly different types of cooling technology. Crucially, they are absolutely not compatible with each other.
1. Standard Reciprocating Compressor (Safe to Upgrade)
These are the highly traditional, black “football-shaped” tanks found in almost most older fridges and many Kenmore models. They actively run on standard 115V AC power from your wall. Additionally, they strictly run at a single, constant speed.
The Verdict: YES, you can safely proceed to install hard start kit hardware on these standard models.
2. LG Linear Compressor (NOT Safe to Upgrade)
Many modern LG and Kenmore Elite fridges (especially those manufactured after 2010) utilize a highly proprietary “Linear Compressor.” These are incredibly advanced, delicate motors. A dedicated computer inverter board actively drives them. This board constantly varies the voltage frequency to save energy. They absolutely do not use a standard start relay.
The Verdict: DO NOT install a hard start kit on any Linear Compressor. If you attempt to wire a high-voltage hard start kit directly to a delicate linear compressor, you will instantly blow up the expensive inverter board. Consequently, you will destroy the entire refrigerator permanently.
How to Safely Identify Your Compressor Type
You must actively confirm your motor type before ordering parts. Pull the fridge out and safely remove the lower back cardboard panel. Look closely for the white factory sticker located directly on the black compressor tank itself.
- Safe to Install: Look closely for the letters “FLA” (Full Load Amps) or “LRA” (Locked Rotor Amps). You should also see “115V ~ 60Hz” clearly printed.
- Do Not Install: Look out for warning words like “Inverter,” “Linear,” or “BLDC.” If you see a weird voltage range printed like “0-220V” or “53-150Hz”, stop immediately.
Tools You Will Need to Install Hard Start Kit Wiring
Successfully installing a Kenmore Elite hard start kit is an incredibly straightforward electrical job. However, precision is absolutely key. You simply cannot guess the wiring connections. Here is your mandatory diagnostic packing list:
- The Specific Part: You need a generic “3-in-1 Start Kit”. The Supco Model RCO410 represents the absolute most common kit for residential fridges sized from 1/4 to 1/3 HP.
- Wire Strippers and Crimpers: You will absolutely need to cut and professionally strip the old fridge power wires.
- Magnetic Nut Driver: You need a 1/4″ hex driver to cleanly remove the back sheet metal panel without stripping screws.
- Electrical Tape and Wire Nuts: These are strictly essential for securing the high-voltage connections safely together.
- Digital Multimeter: This tool is completely non-negotiable. You must use a digital multimeter to accurately identify the specific compressor pins.
- Heavy Zip Ties: You need these to securely mount the new heavy capacitor so it doesn’t violently vibrate against the hot tank.
🛠️ The Required Replacement Part:
Supco RCO410 3-in-1 Hard Start Kit
Why you need this: This specific kit safely replaces all three failing starting components at once. It provides the exact torque required to kickstart a stalled residential compressor.
Step 1: Electrical Safety and Area Preparation
First, you must unplug the refrigerator directly from the wall. We simply cannot stress this safety step enough. You are actively working with the main 120-volt power line of the massive appliance. You must never work on a compressor motor while it remains connected to live city power.
Next, once you safely unplug it, move the heavy fridge carefully away from the kitchen wall. Remove the lower rear access panel (usually made of cheap cardboard or thin metal) to fully expose the compressor compartment. Finally, use a shop vacuum to clean out any thick dust bunnies you see wrapped around the condenser coils while you are working back there.
Step 2: Remove Old Parts Before You Install Hard Start Kit
You must locate the small plastic box attached directly to the side of the massive black compressor. This is the old, broken start relay assembly. It might look white, black, or brown depending on your specific brand.
The Safe Removal Process
- First, use a standard flathead screwdriver to carefully pop off the thin wire bail (the metal retaining clip) holding the plastic block onto the compressor.
- Next, pull the plastic relay assembly straight off the three exposed metal pins sticking out of the compressor tank. It might feel stuck tight. Wiggle it very gently, but always pull perfectly straight back to strictly avoid bending the delicate copper pins.
- Identify the Fridge Supply Wires: Look closely. You will clearly see two main wires coming from the fridge body. These wires actively supply 120V power to this relay block. Usually, one wire is White (the Neutral line) and one wire is Red or Black (the Line/Power line).
- Cut the Supply Wires: Use your tool to cut the old plastic relay entirely off the two wires. Try your best to cut as close to the plastic relay body as possible. This leaves you plenty of wire length to easily work with later.
- Strip the Wires Safely: Strip exactly 1/2 inch of rubber insulation off the ends of these two fridge supply wires. If you do not own a dedicated stripper tool, this is the perfect time to get one. Using kitchen scissors often severely damages the internal copper strands, creating a massive fire hazard.
🛠️ Required Preparation Tool:
Professional Wire Stripper & Crimper Tool
Why you need this: Clean, undamaged copper wire connections are absolutely critical for high-voltage appliance repair to prevent electrical arcing and fires.
Diagnostic Note: If your fridge features a separate run capacitor (a white plastic cylinder mounted to the floor nearby), you can safely disconnect and completely remove it. The new 3-in-1 kit fully replaces that specific function as well.
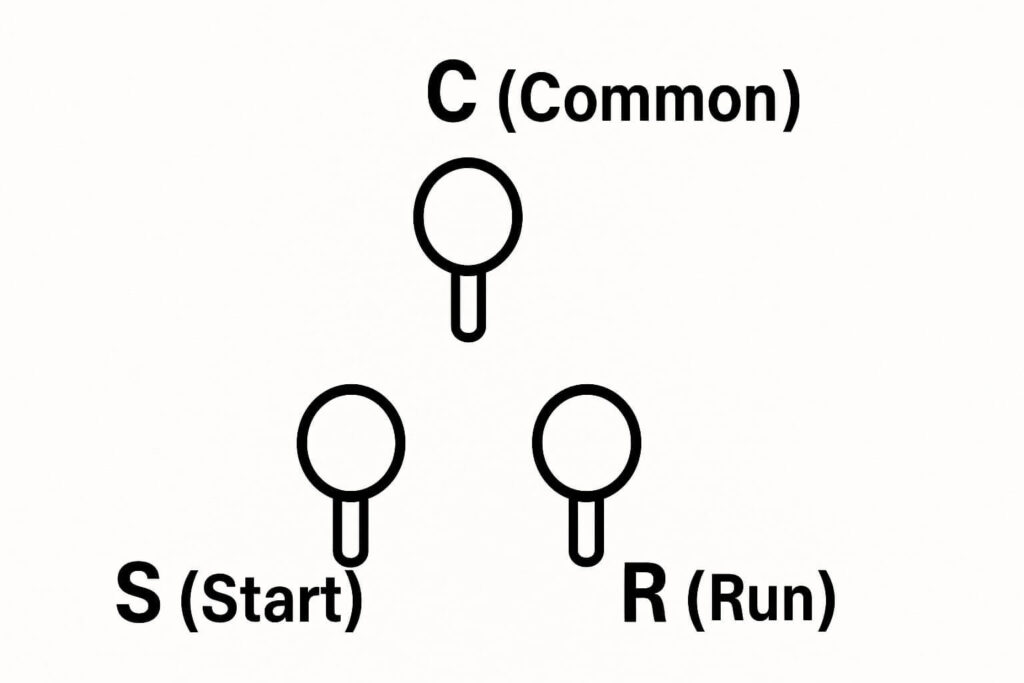
Step 3: Identify Pins to Install Hard Start Kit Correctly
This section represents the absolute hardest part of the entire installation. This is precisely where most amateur DIYers make catastrophic mistakes. The heavy compressor features three bare metal pins arranged perfectly in a triangle.
To install hard start kit wiring correctly, you must definitively know which specific pin acts as Common (C), which is Start (S), and which is Run (R).
Crucially, the physical orientation of this triangle changes heavily by brand. On some specific LGs, the single lone pin sits at the top. On others, it points to the bottom. You cannot guess this. You absolutely need a Digital Multimeter to be 100% sure before wiring.
🛠️ Essential Diagnostic Tool:
Why you need this: You simply cannot map electrical compressor pins blindly. A multimeter measures the exact internal resistance to map the motor perfectly safely.
The Master Multimeter Pin Test Logic
You must follow this exact mathematical logic sequence to map the motor.
- First, safely set your digital multimeter to the lowest Ohms (Ω) resistance setting.
- Next, draw a large triangle on a blank piece of paper. Draw the three pins exactly as you physically see them on the compressor.
- Then, meticulously measure the electrical resistance between all three possible pairs of metal pins (Pin 1 to 2, Pin 2 to 3, and Pin 1 to 3). Write down all three numbers clearly on your paper.
- Find the Highest Number: Look at your three numbers. The two specific pins that give you the absolute highest resistance reading are definitively the Start and Run pins. Therefore, this actively means the third remaining pin (the one your probes are not touching) is your Common (C) pin. Label it “C” boldly on your paper.
- Find Start vs Run: Now that you definitively know which single pin is Common, place one meter probe firmly on that Common pin. Touch the other probe to one of the two remaining pins.
- The pin that displays the higher resistance reading relative to Common is definitively your Start (S) pin.
- The pin that displays the lower resistance reading relative to Common is definitively your Run (R) pin.
Mentor’s Pro Tip: Always double-check your math. The Common + Start resistance added to the Common + Run resistance should exactly equal the total resistance measured between Start + Run.
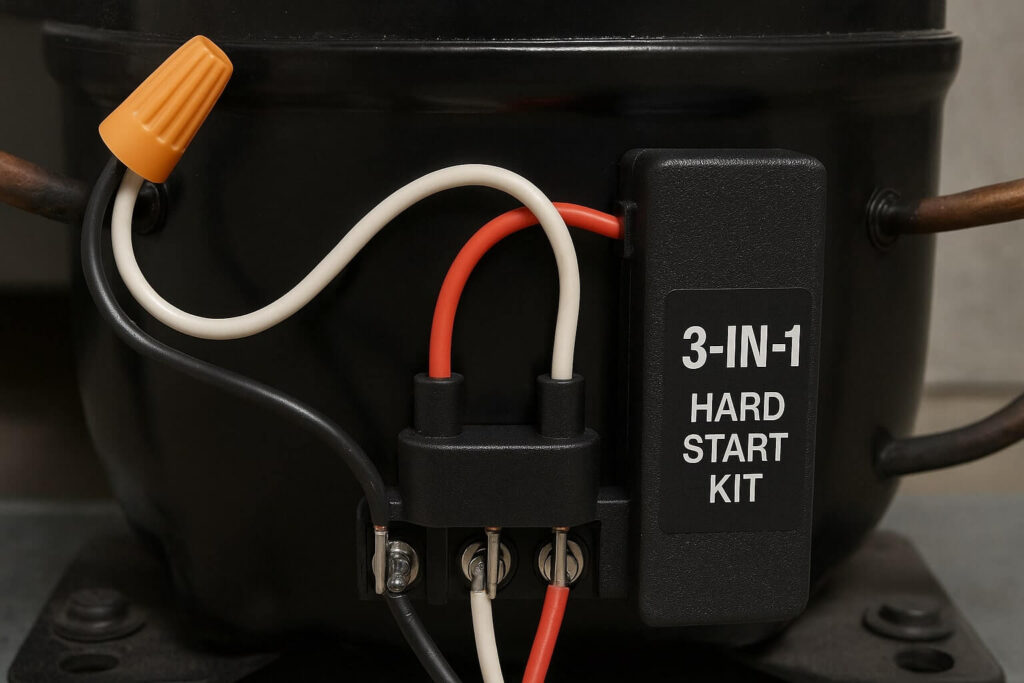
Step 4: Wiring the Hard Start Kit
Now that you successfully mapped your three pins, the actual physical wiring is incredibly simple. Your brand new RCO410 Hard Start Kit comes neatly packaged with three distinct wires permanently attached to a black cylinder. The standard factory color code for a Supco RCO410 is highly universal.
The Supco Color Code
- The Black Wire: This strictly connects to the Common (C) pin.
- The White Wire: This strictly connects to the Start (S) pin.
- The Red Wire: This strictly connects to the Run (R) pin.
Connecting to the Compressor Pins
Firmly push the metal female spade connectors of the Hard Start Kit directly onto the corresponding bare pins you precisely identified in Step 3. Ensure they fit incredibly tight. If the metal connectors feel slightly loose on the pins, carefully use your needle-nose pliers to squeeze them slightly for a much tighter fit. Consequently, a loose connection here will absolutely cause severe electrical arcing and immediate failure.
Connecting to the Main Power
Now, look closely at the two solid black wires coming directly out of the Hard Start Kit casing. These represent the main power input wires. You must connect these to the two main power wires coming from the fridge (the specific ones you cleanly stripped in Step 2).
- First, connect one solid black Kit wire to the Fridge Line wire (usually colored Black or Red).
- Next, connect the other solid black Kit wire to the Fridge Neutral wire (usually colored White).
- Understanding Polarity: Since residential refrigerators use AC (Alternating Current), it generally does not matter which black kit wire goes to which colored fridge wire. However, keeping the actual mechanical connection highly secure is absolutely vital.
- Finally, use high-quality Wire Nuts to aggressively twist the copper connections together tightly. Then, tightly wrap the plastic nuts with professional electrical tape to actively prevent them from ever vibrating loose.
Step 5: Final Mounting Steps
The new Hard Start Kit is significantly heavier and bulkier than the old, tiny plastic relay. You absolutely cannot let it dangle loosely by the delicate wires connected to the compressor pins. The intense daily vibration of the heavy compressor will violently shake the connectors loose within a few days.
- First, find a highly secure spot to mount the new black cylinder. You can safely strap it to a nearby thick copper pipe (insulate it securely with electrical tape first) or mount it directly to the metal frame of the fridge base.
- Next, use a thick, strong heavy-duty Zip Tie to secure it incredibly firmly in place.
- Then, meticulously ensure all wires are tucked away safely. They absolutely must not touch the spinning condenser fan blade or the scorching hot compressor tank casing.
- Finally, plug the heavy refrigerator safely back into the wall outlet.
How to Verify Success After You Install Hard Start Kit
Once you firmly plug the fridge back in, you must listen incredibly carefully to the machine’s initial boot sequence.
Listening for Success Indicators
Ideally, you should clearly hear a solid, sharp “Click.” This click should be followed immediately by a very strong, low-pitched, steady hum. This beautiful sound indicates the compressor is successfully running again. Check the silver evaporator coils located inside the freezer after 20 solid minutes. They should be getting icy and frosty to the touch.
Analyzing Failure Indicators
Conversely, what if you hear a sharp click, a desperate hum for exactly 10 seconds, and then another loud click followed by dead silence? This sequence means the heavy compressor is still violently tripping the internal thermal overload. The hard start kit simply was not powerful enough to save a mechanically seized motor. If you hear absolutely nothing at all, immediately check your wire nut connections. One wire likely came loose during installation.
Frequently Asked Questions (FAQ)
Is it difficult to install hard start kit units for a beginner?
Why is my compressor scorching hot after I install hard start kit?
Can I safely use this exact kit on a GE or Whirlpool fridge?
How long will my refrigerator last after installing a hard start kit?
Conclusion: The Ultimate Hail Mary Repair
In conclusion, learning exactly how to properly install hard start kit devices on an aging LG or Kenmore fridge represents an incredibly valuable life skill. It can literally save you from a highly stressful, emergency appliance purchase. For less than $20 and exactly 30 minutes of diagnostic work, you are effectively giving your aging compressor the massive electrical “jump start” it desperately needs to keep your family’s food cold.
However, you must always remember that a hard start kit often serves as a temporary band-aid for a slowly dying compressor. You must use the extra time wisely to prepare for a replacement.
One major reason expensive compressors fail prematurely is extreme overheating caused entirely by dirty condenser coils. Therefore, to ensure your brand new hard start kit lasts as absolutely long as possible, we heavily recommend cleaning your floor coils immediately after finishing this installation.
🛠️ Highly Recommended Maintenance Tool:
Refrigerator Coil Cleaning Brush
Why you need this: Airflow is the absolute key to compressor survival. Cleaning the dust actively lowers the operating temperature and massively reduces electrical strain on your new hard start kit.
Need more diagnostic help? Be sure to read our full, detailed guide on how to clean refrigerator condenser coils safely. This routine maintenance will actively maximize your hard start repair and extend the appliance’s life.


