

Learning how to test refrigerator thermostat components is the final step in diagnosing a fridge that is either too warm or freezing your food. If you have already cleaned your coils and checked your fans, but the temperature is still erratic, the “brain” of your cooling system might be dead.
The thermostat (or temperature control) tells the compressor when to turn on and off. If it fails, your fridge becomes “blind” to the temperature inside.
However, before you buy a part, you need to know which part you actually have. Older fridges use a mechanical thermostat. Newer digital fridges use an electronic sensor called a thermistor.
In this guide, we will show you exactly how to test refrigerator thermostat units and perform a refrigerator thermistor test using a multimeter, so you can stop guessing and start fixing.
Why You Need to Know How to Test Refrigerator Thermostat Parts
The thermostat is the on/off switch for your cooling system. When it breaks, it usually fails in one of two ways, causing specific bad thermostat symptoms.
Symptom 1: Stuck Open (No Cooling)
The thermostat thinks the fridge is always cold enough, so it never turns the compressor on.
- Result: Your food spoils, but the lights work. This mimics a bad start relay.
Symptom 2: Stuck Closed (Freezing)
The thermostat thinks the fridge is always hot, so it runs the compressor 24/7.
- Result: Your milk turns to ice. (Internal Link ->) See our guide on refrigerator freezing food for more on this specific symptom.
Knowing how to test refrigerator thermostat failure saves you from replacing expensive parts like the compressor when a $20 switch is the real culprit.
Step 1: Identify Your Part (Thermostat vs. Thermistor)
You cannot test them the same way. Before you grab your tools, you must identify what technology your fridge uses.
The Mechanical Thermostat (Older Models)
If your fridge has a dial knob that you turn to set the temperature (labeled 1-9 or Cold-Coldest), you have a mechanical thermostat.
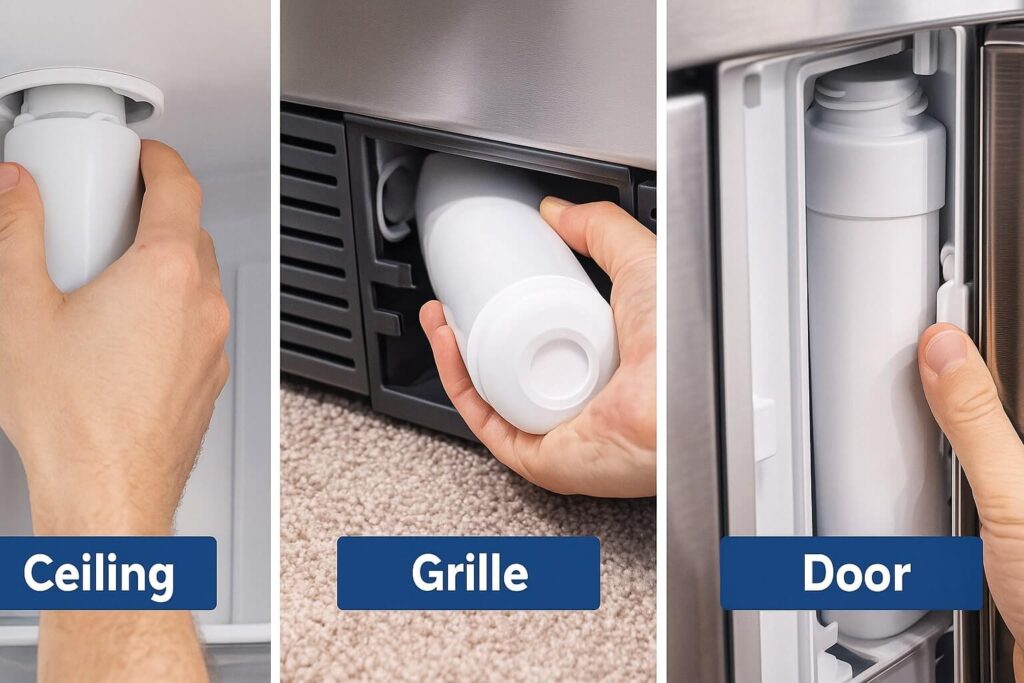
- Location: Usually inside the control housing box on the ceiling of the fridge section.
- Look for: A metal box with two wire terminals and a long metal “capillary tube” attached to it.
The Thermistor (Newer/Digital Models)
If your fridge has a digital display with specific numbers (e.g., 37°F), you have a thermistor.
- Location: Usually hidden behind a small plastic grille on the back wall or ceiling.
- Look for: A small plastic capsule shape (like a jelly bean) connected to wires.
Step 2: Tools Needed for a Refrigerator Thermistor Test
You cannot diagnose these parts by looking at them. You need to see if electricity can flow through them.
The Essential Tool:
You need a digital multimeter. You do not need an expensive one; a basic $50 meter from Amazon works perfectly.
Other Tools:
- Screwdriver: Phillips and flathead to remove the housing.
- Needle-nose pliers: To pull wire connectors off terminals.
- A glass of ice water: Essential for the refrigerator thermistor test.
Step 3: How to Test Refrigerator Thermostat (Mechanical)
If you have a dial, follow this process. We will test for “Continuity,” which simply means a continuous path for electricity to flow.
1. Access the Thermostat
Unplug the fridge. Remove the plastic cover housing the light bulb and temperature dial. You may need to remove a few screws. Locate the metal thermostat box.
2. Remove the Wires
Take a picture of the wires first so you remember where they go. Then, use needle-nose pliers to pull the two wires off the thermostat terminals.
3. The “Click” Test (Continuity)
Turn your multimeter to the lowest Ohms setting or the Continuity (beep) mode.
- Test A (OFF): Turn the thermostat dial all the way to “Off.” Touch the probes to the two terminals. The meter should read “OL” (Open Loop). This means no power flows.
- Test B (COLD): Turn the dial to the coldest setting. You should hear a click. Touch the probes to the terminals. The meter should read 0.00 Ohms (or beep). This means power flows.
Verdict: If the meter stays on “OL” even when turned to the coldest setting, the internal contacts are broken. You need a replacement.

Step 4: Performing a Refrigerator Thermistor Test (Digital)
Testing a thermistor is different. It doesn’t click on and off; it changes resistance based on temperature. This is the advanced version of how to test refrigerator thermostat sensors.
1. Locate the Sensor
Find the thermistor capsule. It is often covered by a small plastic cage. You may need to unscrew it or cut the wires (leave enough room to splice later) to remove it for testing.
2. The Ice Water Method
Fill a glass with ice and water. Let it sit for a minute to reach exactly 32°F (0°C). Place the thermistor tip into the ice water.
3. Measure Resistance
Set your multimeter to the 20k Ohms setting. Touch the probes to the two wire ends of the thermistor.
- Consult Your Manual: Every brand has a specific resistance chart.
- General Rule: Many GE and Samsung thermistors should read roughly 13,000 Ohms (13k) to 16,000 Ohms at 32°F.
- The Failure: If the reading is way off (like 0 Ohms or Infinity/OL), or if it reads 5k when it should be 13k, the sensor is dead.
If the refrigerator thermistor test shows incorrect resistance, the control board is getting bad data, causing your refrigerator not cooling properly.
Step 5: Installing the Replacement Part
Once you confirm the failure, replacement is simple.
For Mechanical Thermostats:
- Buy the specific model number part.
- Carefully uncoil the long metal tube (do not kink it!).
- Insert the tube into the same slot the old one came from.
- Reconnect the two wires and screw the housing back in.
For Thermistors:
- Buy a new refrigerator temperature sensor.
- If it comes with a harness plug, simply plug it in.
- If it is a “splice” type, cut the old wires and use the included butt-connectors to crimp the new sensor onto the old wires.
- Seal the connection with heat shrink or electrical tape to prevent moisture damage.
Related Issues: What Else Could It Be?
If you learned how to test refrigerator thermostat parts and they tested fine, check these other components:
- The Relay: If the thermostat sends power (“Click”) but the compressor doesn’t start, check the relay. Read our guide on how to test a refrigerator starter relay.
- The Airflow: If the thermostat works but the fridge is warm, the cold air might be blocked. Check the damper control.
- The Defrost Timer: On older fridges, the timer can get stuck in “defrost mode,” shutting off cooling even if the thermostat is asking for it.
Frequently Asked Questions (FAQ)
1. Can I bypass the thermostat to test the fridge?
Yes. On a mechanical thermostat, you can temporarily connect the two wires together (safely, with a jumper wire). If the compressor kicks on immediately, you know the thermostat was the broken link. Do not run it like this for long, or you will freeze your food.
2. How much does a new thermostat cost?
A mechanical thermostat typically costs between $50 and $100. An electronic thermistor is much cheaper, usually $15 to $35.
3. Why is my fridge temp fluctuating wildly?
This is a classic sign of a failing thermistor. It is giving “drifted” readings, telling the computer it’s cold one minute and hot the next. Replacing the sensor usually stabilizes the temperature.
4. Do I need to unplug the fridge to test the thermistor?
Yes. Always unplug the appliance before stripping wires or removing sensors to avoid electrical shock or shorting out the main control board.
Conclusion: The Brain of the Operation
Whether you have a dial or a digital display, the temperature control is critical.
By learning how to test refrigerator thermostat issues yourself, you can rule out the most common electrical control failure and save hundreds on a repair bill.
Your Action Plan:
- Identify: Do you have a dial (thermostat) or a screen (thermistor)?
- Test: Use a multimeter to check continuity or resistance.
- Replace: Swap the part if the numbers don’t match.


