
")
Learning how to test a refrigerator starter relay is the fastest, most effective way to save a fridge that is clicking but not cooling. You walk into the kitchen and hear a loud, metallic “click,” followed by a brief electrical buzz, and then absolute silence. A few minutes later, the exact same sequence happens again.
That repetitive clicking sound is the number one sign that this small, inexpensive electrical component has failed. The starter relay acts as the “ignition key” for your compressor. If it dies, the massive mechanical compressor simply cannot start. Without a running compressor, your fridge stops removing heat and becomes nothing more than a giant insulated box. In fact, a blown relay is the absolute most common reason for a refrigerator making a clicking noise.
The good news? You do not need to call an expensive professional to diagnose this. You can safely determine if this part is bad in less than two minutes using basic tools.
In this comprehensive DIY guide, we will show you exactly how to test a refrigerator starter relay using two proven methods: the simple “Shake Test” and the professional “Multimeter Test.” While most relays function similarly, the Whirlpool starter relay test is frequently searched because they often use a specific “PTC” style relay that looks a bit different, which we will also cover below.
💡 Mentor’s Diagnostic Hub
Dealing with multiple cooling issues? A clicking relay is just one part of the cooling cycle. Learn how to diagnose every part of your appliance’s sealed system and electronics.
Before You Learn How to Test a Refrigerator Starter Relay
Before you start pulling parts off your appliance, it helps to understand what you are actually looking for and how the electrical circuit operates.
The compressor is the heavy mechanical engine of your fridge. To overcome internal pressure and begin spinning, the compressor requires a massive, instantaneous surge of electricity—far more than it needs to simply keep running. The starter relay (which is almost always paired with an overload protector) acts as the gateway for that initial 15-amp electrical jolt. Once the compressor reaches its running speed, the relay disconnects the start windings.
The Core Failure Symptoms
When this part fails, the compressor desperately tries to start but simply doesn’t have the electrical torque to do so. You will notice three distinct symptoms:
- The Click-Buzz-Click: You will hear a loud metallic click, a few seconds of buzzing, and another click every 2 to 5 minutes. This is the overload protector tripping to prevent the compressor from catching fire when the relay fails to start it.
- Rising Temperatures: Both the fresh food and freezer compartments are steadily getting warm, despite the interior lights working perfectly.
- A Silent Compressor: You might hear the internal evaporator fans spinning, but the heavy mechanical hum of the compressor at the back of the unit is completely absent.
If you have these exact symptoms, learning how to test a refrigerator starter relay can save you a $300 emergency service call.
Safety First: Prepping the Fridge
You are about to work with high-voltage electrical components that sit right next to a grounded metal chassis. Safety is absolutely non-negotiable.
- Unplug the Unit: Pull the power cord entirely out of the wall outlet. Never open the lower back machine panel while the fridge has live electricity flowing to it.
- Access the Back: Carefully roll the refrigerator away from the wall so you have ample lighting and room to work comfortably.
- Remove the Access Panel: Use a 1/4-inch nut driver or Phillips screwdriver to remove the cardboard or vented metal cover located at the bottom rear of the appliance.
Method 1: How to Test a Refrigerator Starter Relay by Shaking
This is the fastest, easiest way to diagnose a PTC (Positive Temperature Coefficient) relay problem. You don’t need fancy tools or an electrical degree to learn how to test a refrigerator starter relay; you just need your ears.
Step 1: Locate the Relay Assembly
Look at the large, black, football-shaped metal tank sitting on the bottom floor of the fridge—this is the compressor. On the side of this black tank, you will see a small plastic box (usually black, white, or brown) with several wires connected to it. This is the start relay and overload assembly.
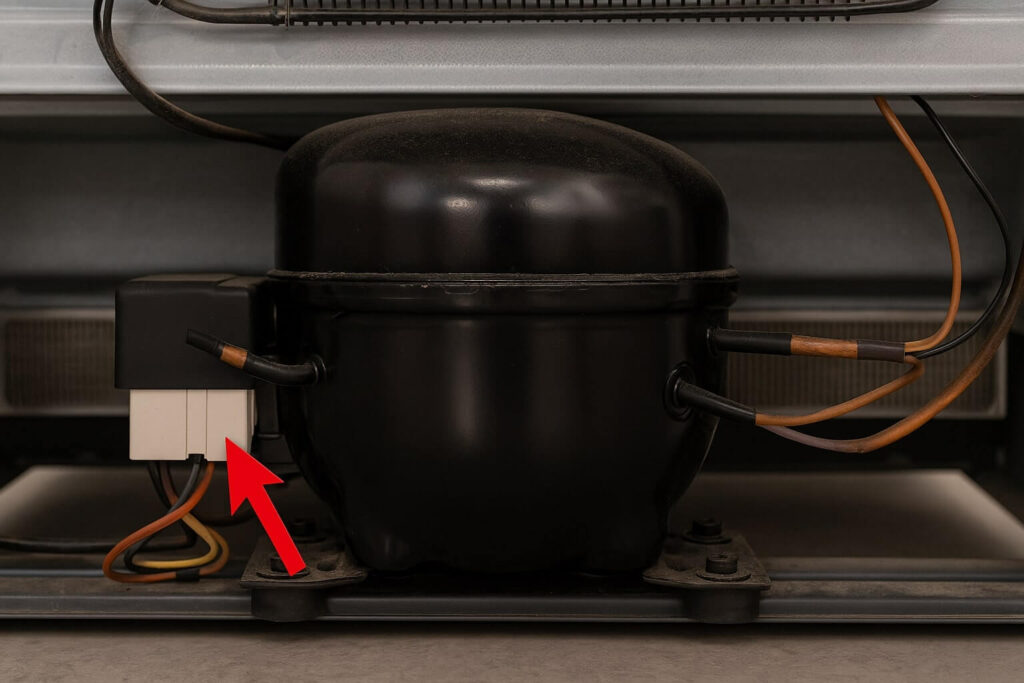
Step 2: Remove the Relay
You may need to use a flathead screwdriver to gently pop off a metal wire retaining clip holding the plastic cover in place. Once the clip is removed, grip the plastic relay housing and pull it firmly straight back off the compressor. It plugs directly into three metal pins extending from the compressor casing. It might be tight, so wiggle it gently side to side as you pull.
Step 3: The “Shake Test”
Inside a PTC start relay is a small ceramic disc that conducts electricity. When it fails, this ceramic disc literally shatters from extreme heat. Hold the plastic relay near your ear and shake it like a box of matches.
- If it rattles: The relay is definitively bad. The internal ceramic components have shattered into pieces. You must replace it immediately.
- If it is silent: It might still be good, or it might have suffered a non-visible burnt contact failure. To be absolutely sure, proceed to Method 2.
Note: If the relay rattles, you have solved your mystery! You can confidently order a new refrigerator starter relay online and install it in seconds.
Method 2: How to Test a Refrigerator Starter Relay with a Multimeter
If the relay didn’t rattle, but your compressor is still clicking and your freezer is melting, you need to test the internal electrical continuity. This requires a standard digital multimeter.
Step 1: Set Up the Multimeter
Turn your multimeter dial to the lowest setting for Ohms of resistance (Ω) (usually the 200 setting) or switch it to the “Continuity” setting (the icon that looks like sound waves and beeps when the probes touch).
Step 2: Identify the Terminals
Look at the side of the relay that plugs into the compressor. You are looking for the two small, round metal sockets that slide over the compressor pins. In standard relays, these correspond to the “S” (Start) and “M” (Run/Main) windings.
Step 3: Test for Continuity
Place one metal multimeter probe into the Start terminal hole and the other probe into the Main terminal hole.
- Good Relay: The meter should display a reading close to zero ohms (typically between 3 and 12 ohms at room temperature). This means the electrical pathway is intact and electricity can freely flow to start the motor.
- Bad Relay: The meter screen stays completely blank, reads “OL” (Open Loop), or shows a “1” on the far left. This indicates infinite resistance. The internal circuit has burnt open, and no electricity can pass through.
If you get an “OL” reading, you have successfully confirmed how to test a refrigerator starter relay failure electrically. The part is entirely dead and must go in the trash.

Step 4: Installing the New Relay
Once you have confirmed the part is bad, replacing it is highly rewarding and incredibly easy.
- Buy the Exact Part: Ensure you buy the specific OEM relay for your refrigerator model. If you have a very old fridge where the OEM part is obsolete, you can safely use a high-quality “3-in-1 Hard Start Kit” as a universal replacement.
- Transfer the Wires: Carefully unplug the female wire spade connectors from the old relay and slide them onto the exact same male terminals on the new unit. Needle-nose pliers can help if they are stuck.
- Push it On: Line up the two or three holes on the new relay perfectly with the metal pins protruding from the compressor and push it on firmly until it bottoms out.
- Secure It: Snap the metal retaining clip back into place to prevent it from vibrating loose.
Once everything is secure, plug the fridge back into the wall. You should hear the beautiful, deep hum of the compressor springing to life instantly. Give it a few hours, and if it starts cooling, you just saved hundreds of dollars and all of your groceries!
What to Do After Learning How to Test a Refrigerator Starter Relay
If you followed this guide on how to test a refrigerator starter relay and the part passed both the shake test and the multimeter test with flying colors, your cooling problem lies deeper in the appliance.
1. Check the Run Capacitor
Many modern fridges have a separate “Run Capacitor” attached directly to the relay assembly (it looks like a white or black plastic cylinder). If this capacitor is swollen, bulging at the seams, or has burn marks, it cannot hold an electrical charge and must be replaced.
2. The Compressor is Locked Up
If the relay is 100% good, but the compressor still just “clicks,” gets extremely hot to the touch, and refuses to vibrate or run, the internal mechanical pistons inside the compressor have likely seized. This is a catastrophic failure. Check our guide on a refrigerator not cooling but running for a broader diagnostic breakdown of sealed system failures.
3. Main Control Board Failure
If the compressor never even tries to start—there is no click, no buzz, no warmth, and complete silence—the main electronic control board is likely failing to send the 120V signal down to the relay. See our guide on what to do if your refrigerator is not cooling after a power outage to check for board-level electrical damage.
Frequently Asked Questions (FAQ)
Can I bypass the starter relay to test the compressor?
How much does a starter relay cost to replace?
What exactly causes a starter relay to fail?
Will a bad start relay cause the house breaker to trip?
Conclusion: Mastering How to Test a Refrigerator Starter Relay
Hearing that repetitive “click-buzz-click” from the back of your appliance is incredibly stressful, especially when it is full of expensive groceries. But now you know it is usually caused by a simple, $20 plastic component.
Knowing exactly how to test a refrigerator starter relay gives you the diagnostic power to identify the fault in your fridge in minutes, without waiting days for a technician.
Your Action Plan:
- Unplug the fridge from the wall outlet.
- Remove the small plastic relay from the side of the compressor.
- Shake it to test for shattered ceramic, and use a multimeter to check for Ohms continuity.
If it rattles loudly or fails the continuity test, replace it. It truly is that simple.


