

Is your refrigerator water dispenser flowing slowly? Does the ice taste a bit “off,” or has that annoying red filter status light turned on? If so, it is time to learn how to replace refrigerator water filter units to ensure your family is drinking clean, safe water.
Replacing the filter is one of the easiest DIY maintenance tasks you can perform, yet many homeowners put it off for months. A clogged filter not only allows contaminants like lead and chlorine into your glass, but it can also restrict water pressure, causing strain on your fridge’s water valve.
In this guide, we will walk you through the entire process—from finding the right replacement part to the final installation. We also cover specific steps for EveryDrop water filter replacement and how to perform the tricky refrigerator water filter light reset on major brands like Whirlpool, Samsung, GE, and LG.
Why You Should Replace Refrigerator Water Filter Regularly
Manufacturers recommend changing your water filter every 6 months or after dispensing 200 gallons of water. While it might be tempting to hit the reset button without changing the part, doing so carries risks:
- Bacterial Growth: Old filters can become breeding grounds for bacteria once the carbon becomes saturated.
- Scale Buildup: A fresh filter reduces mineral deposits that can damage your ice maker.
- Poor Taste: The primary job of the filter is to remove chlorine taste and odor.
Step 1: Locate the Part Before You Replace Refrigerator Water Filter
Before you can swap the part, you need to find it. Manufacturers place them in one of three common spots:
- The Upper Right Corner (Interior): Common in Whirlpool and Maytag french door models.
- The Base Grille (Kickplate): Often found in older side-by-side models. You may need to crouch down to see the cap.
- Inside the Door Panel: Frequently used in LG and Kenmore Elite models to save shelf space.
Finding the Right Replacement Part number
Do not guess! Open your fridge, locate the current filter, and snap a picture of the model number printed on the label. If you own a Whirlpool, Maytag, KitchenAid, or Amana fridge, you likely need an EveryDrop filter (labeled 1 through 6).
Check Price and Compatibility for EveryDrop Filters on Amazon

Step 2: How to Remove Refrigerator Water Filter (Old Unit)
Removing the old filter depends on the locking mechanism. There are two main styles you will encounter:
The Push-Button Eject
Common in base-grille filters. Locate the button next to the filter cap. Press it firmly. The filter should pop out slightly, allowing you to pull it the rest of the way. Note: Do not throw away the decorative cap; you will need to twist it onto the new filter!
The Twist-and-Pull
This is standard for EveryDrop water filter replacement in the ceiling location.
- Clear the top shelf of any tall items.
- Grip the filter (or the plastic cover).
- Twist counter-clockwise (to the left) about a quarter turn until the handle is vertical.
- Pull straight down. It is normal for a small amount of water to drip out, so have a towel ready.

Step 3: Instructions to Replace Refrigerator Water Filter (New Unit)
Once the old unit is out, installing the new one is usually the reverse process. However, there are a few critical tips to ensure you don’t get leaks.
- Remove the Seals: Take the new filter out of the box and remove the protective O-ring covers (usually red or pink plastic caps) at the top.
- Align the Grooves: Look at the “Insert” arrow on the new label. Align it with the arrow on the filter housing.
- Push and Twist: Push the filter up into the housing and twist clockwise (to the right) until it snaps into place or stops rotating. It should feel snug.
Step 4: The Crucial Flushing Step
This is the most skipped step! New carbon filters contain loose carbon dust. If you don’t flush the system, your first few glasses of water will look cloudy or gray, and the air trapped in the line will cause the dispenser to sputter.
Instruction: Dispense approximately 4 gallons of water into a large pitcher. Dump this water down the sink (or water your plants with it). Continue until the water runs clear and the sputtering stops.
Step 5: Refrigerator Water Filter Light Reset Guide
You have installed the new part, but that annoying red or orange light is still blinking. The fridge does not automatically know you changed the filter; you must manually reset the timer. Here is how to do a refrigerator water filter light reset for the major brands:
Whirlpool & KitchenAid
Look for the “Filter Reset” button on the touch screen. If there isn’t one, press and hold the “Water type” and “Light” buttons simultaneously for 3 seconds until the light flashes and turns blue.
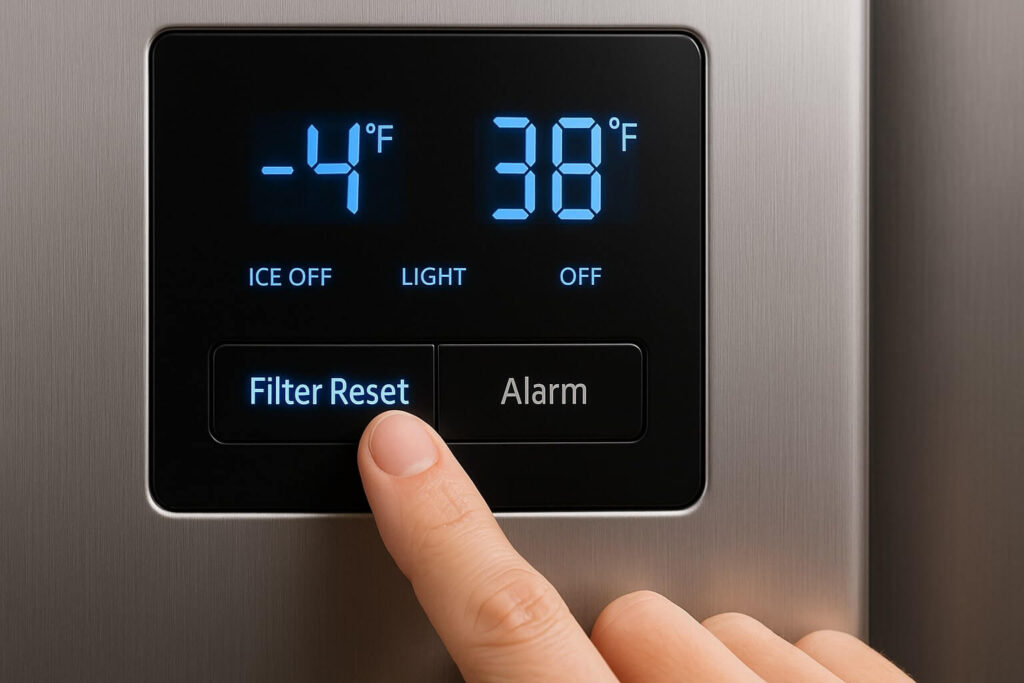
Samsung
Press and hold the “Alarm” button (or the button labeled “Hold 3 sec for Filter Reset”) for 3 to 5 seconds. On some Family Hub models, you must go into the Settings > Fridge Manager menu.
GE (General Electric)
Press and hold the “Reset Filter” button on the dispenser pad for 3 seconds. If your model doesn’t have that button, hold the “Water” and “Crushed Ice” buttons together for 5 seconds.
LG
Press and hold the “Light/Filter” button for 3 seconds. The “Replace Filter” icon should turn off.
FAQ: Replacing Refrigerator Water Filter Issues
Why is my water pressure low after changing the filter?
You may not have twisted the filter in all the way. If the valve inside the housing isn’t fully depressed by the filter, water flow is restricted. Remove and reinstall it, ensuring a tight lock.
Can I use a generic off-brand filter?
While generic filters are cheaper, they often lack the NSF certification for removing lead and pharmaceuticals. For the best safety, stick to OEM parts. You can read more about water safety standards at NSF International.
Conclusion
Learning how to replace refrigerator water filter cartridges is a simple 5-minute task that protects your health and your appliance. By keeping up with this maintenance twice a year, you ensure your water is crisp, clean, and flowing freely.
Need more help with your fridge? Check out our guide on fixing a noisy refrigerator to keep your kitchen quiet.


