

Finding black specks in your refrigerator water or ice is alarming, but it typically indicates degrading water filter media rather than a dangerous contamination. While small charcoal particles are harmless if ingested in small amounts, consistent debris suggests your filtration system is failing, a biological issue is present, or internal components are mechanically disintegrating.
Common causes for this symptom include a new water filter not being flushed properly, a degrading “knock-off” generic filter, or mold growth in the dispenser lines. However, in older refrigerators, it can also indicate that the non-stick coating on your ice maker mold is peeling off. Identifying the source quickly is essential to ensure your water remains safe to drink.
In this guide, we will provide a step-by-step diagnostic procedure to determine why there are black specks in your refrigerator water, how to perform the “Smear Test” to identify the debris, and specific cleaning protocols for major brands like Samsung, LG, and Whirlpool.
Safety First: The “Smear Test”
Before panicking, it is necessary to differentiate between harmless carbon dust and biological growth (mold). Refrigerator filters use activated carbon blocks to clean water, which can shed particles.
The “3-Second Rule” for Identification
The quickest way to diagnose the debris type without a lab test is the “Smear Test.”
- Fill a clear glass with water from the dispenser.
- Fish out one of the black specks and place it on a white paper towel.
- Smear it with your finger.
- The Result:
- Crumbles/Streaks Black: It is Carbon/Charcoal. This is safe but annoying. It means your filter is new and wasn’t flushed, or it is old and breaking down.
- Smears Green/Slimy: It is Mold/Algae. This is a hygiene issue. You must stop drinking the water immediately and sanitize the lines.
- Hard/Flaky (Non-Smearing): It is likely Peeling Teflon or Mineral Scale. This indicates a mechanical failure of the ice maker assembly.
If the specks are slimy, you likely have a biofilm issue.
🛠️ Required Tool for Testing:
TDS Water Quality Tester Meter
Why: Instantly tells you if your water has high levels of dissolved solids compared to your tap water.
Identify Your Contamination Source
The source of the specks varies significantly based on recent maintenance history.
Scenario A: You Just Changed the Filter
- Cause: Residual carbon dust.
- Behavior: Specks appear immediately after installing a new cartridge.
- The Fix: You must flush 3-4 gallons of water through the dispenser to clear the loose dust.
Scenario B: You Haven’t Changed the Filter in 6+ Months
- Cause: Filter degradation.
- Behavior: The internal carbon block is breaking apart due to water pressure and age.
- The Fix: Replace the filter immediately. Old filters can harbor bacteria.
Scenario C: Mold in the Chute (Samsung/LG)
- Cause: Airborne yeast and moisture.
- Behavior: Black specks appear in ice but not water, or you see visible black gunk on the dispenser nozzle.
- The Fix: Physical scrubbing of the dispenser chute is required.
The Definitive “Bypass Plug” Isolation Test
If you cannot determine if the black specks are coming from the filter or the refrigerator lines themselves, you must perform an “Isolation Test.”
Every refrigerator ships with a Filter Bypass Plug (usually a blue or white plastic cap). This device allows water to flow to the dispenser without passing through a filter.
The Procedure:
- Remove your current water filter.
- Install the Bypass Plug in its place.
- Dispense 1 gallon of water into a pitcher.
- Analyze the Water:
- Clear Water: The issue was the filter. It was either defective or degraded. Buy a new OEM filter.
- Still Has Specks: The issue is downstream from the filter. The contamination is inside your refrigerator’s water tubing or reservoir tank. This requires professional line cleaning or replacement.
The Hidden Culprit: Peeling Teflon (The “Pepper” Effect)
If your “Smear Test” revealed hard, flaky particles that did not streak, you are likely not dealing with charcoal at all. You are dealing with a failing Ice Maker Assembly.
The Mechanism:
Most automatic ice makers (especially older Whirlpool and GE models) use a metal mold tray to freeze the water. To ensure the ice cubes eject smoothly, this tray is coated with a non-stick material (similar to Teflon).
The Failure:
Over 5–10 years of freezing and heating cycles, this coating becomes brittle. It begins to flake off into the ice cubes.
- Symptom: Grey or black flakes embedded inside the ice cubes.
- Appearance: Looks like coarse black pepper.
- The Fix: You cannot repair the coating. You must replace the entire Ice Maker Assembly. (Cost: approx $100–$150).
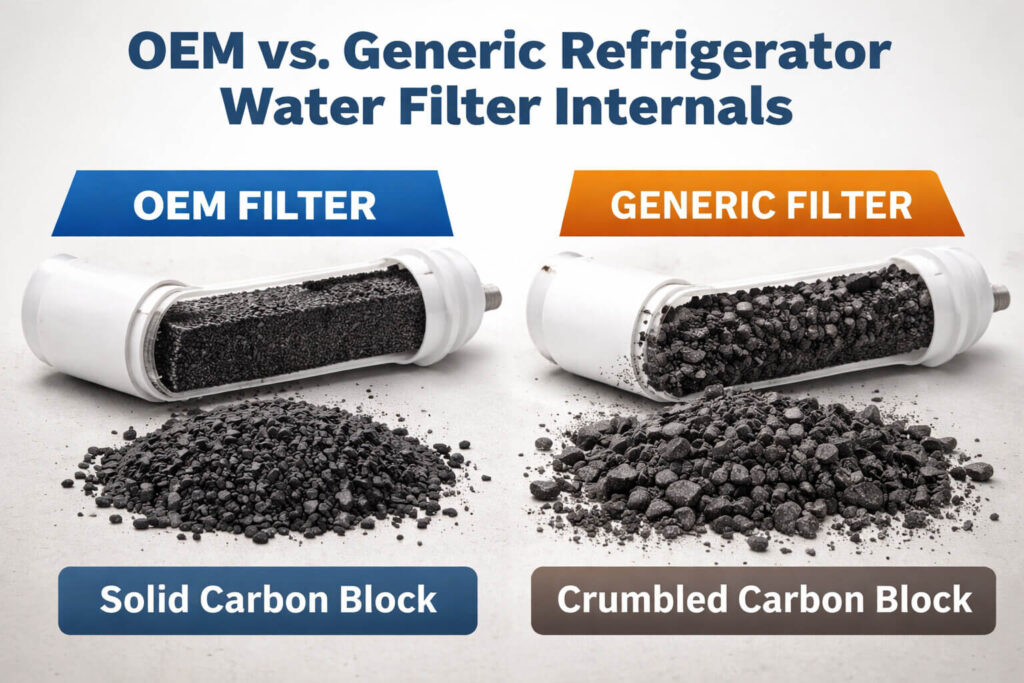
The #1 Cause: Cheap “Knock-Off” Filters
The most common cause of persistent black specks is the use of non-OEM (Original Equipment Manufacturer) filters.
Generic filters often use lower-quality binding agents for the carbon block. Under the pressure of household water lines (40-60 PSI), these cheaper blocks can crumble, releasing charcoal into your glass.
The Fix:
- Remove the current filter. Shake it over a sink. If charcoal rattles out easily, it’s defective.
- Buy a Certified Brand Name Filter. (Samsung, LG, EveryDrop).
- Result: Water clarity should return immediately after flushing the new filter.
🛠️ Recommended Part:
EveryDrop by Whirlpool Water Filter (Check Your Model)
Why: Certified to reduce 99% of lead and won’t crumble like cheap generics.
Deep Dive: The Science of “Pink Slime” & Biofilm
If your “Smear Test” resulted in a slimy texture, you are likely dealing with Biofilm.
What is it?
Often mistaken for black mold, this is frequently a bacteria called Serratia marcescens (Pink Slime) or Cladosporium (Black Mold). These are airborne fungi that thrive in dark, damp environments.
They do not come from your water supply; they grow up into the dispenser from the air in your kitchen. Every time you fill a glass, splash back hits the nozzle, providing moisture. The yeast in the air (from baking or fruit bowls) provides food. Over time, this builds a colony that flakes off into your cup.
The Danger Zones:
- The Drip Tray: Often neglected, this is a breeding ground for spores.
- The Dispenser Nozzle: The small plastic tube where water exits.
- The Ice Chute Flapper: If this door doesn’t seal perfectly, warm kitchen air enters the ice chute, causing condensation and mold growth inside the door.
The “Mathematics” of Flushing (Stop Under-Flushing!)
The most common user error is under-flushing a new filter. Manufacturers recommend flushing 3 to 4 gallons.
What does 4 Gallons look like?
- It is 64 cups of water.
- It is roughly 5 to 7 minutes of holding the button.
Most users dispense 2 or 3 cups, see clear water, and stop. However, microscopic carbon dust is still trapped in the block. To properly clear it, use the “Pulse Method”:
- Press the dispenser paddle for 30 seconds.
- Release and wait for 5 seconds.
- Repeat this cycle until you hit the 4-gallon mark.
The sudden start/stop action creates a “water hammer” effect inside the cartridge, which is more effective at shaking loose the excess carbon dust than a steady stream.
Advanced: Cleaning the Dispenser Nozzle
If the water is clear but the ice has black specks, the issue is likely the ice chute or dispenser nozzle.
Safety Warning: Unplug the fridge or lock the dispenser before cleaning to avoid accidental dispensing.
Step 1: Inspect the Nozzle
Look up into the water dispenser area with a flashlight.
- Look for: Black slimy buildup around the water tube exit.
- Cause: Splashing sugared drinks or simple humidity can cause mildew growth here.
Step 2: The Vinegar Scrub
- Mix 50% white distilled vinegar and 50% warm water.
- Use a clean toothbrush or cotton swab dipped in the solution.
- Action: Scrub the nozzle inside and out until no black residue remains. Run 2-3 cups of water to rinse.
The 50% Rule: Cleaning vs. Service Call?
Water system repairs can be tricky. However, if your refrigerator is old enough to experience filter housing degradation, it is vital to check the rest of the mechanical system.
Perform a Health Check:
While you are servicing the water lines, listen to the machine. If you hear strange clicking noises or find that the compressor is hot to the touch, you may have a larger mechanical failure looming.
- The External Factor: If the specks are only on the nozzle or drip tray, Clean it yourself. This is maintenance, not a repair.
- The Internal Factor: If you have changed the filter, flushed 4 gallons, and still get black specks, the water lines inside the door may be deteriorating.
- The Cost Factor: Replacing internal door tubing often requires replacing the entire door shell ($500+). If the fridge is old, consider bypassing the fridge dispenser and using a pitcher filter instead.
Summary: Action Plan
| Symptom | Test Result | Likely Cause | Solution |
|---|---|---|---|
| New Filter Installed | Streaks Black | Loose Carbon Dust | Flush 64 Cups (4 Gal) |
| Old Filter (6mo+) | Streaks Black | Filter Degrading | Buy OEM Filter |
| Ice Only | Hard Flakes | Peeling Teflon | Replace Ice Maker |
| Dispenser/Nozzle | Slimy/Green | Biofilm/Mold | Scrub with Vinegar |
Frequently Asked Questions
Q: Is it safe to drink water with black specks from the fridge?
A: If the specks are carbon (charcoal), yes, they are generally non-toxic, though unappetizing. Refrigerator filters use coconut-shell carbon which passes through the body without harm. However, if the specks are slimy (mold) or hard flakes (Teflon), no, you should not consume them.
Q: Why do I still have black specks after changing the filter?
A: You likely haven’t flushed the system enough. Manufacturers recommend flushing 3 to 4 gallons (approx 64 cups) of water through a new filter to clear loose carbon fines. Use the “Pulse Method” described above for best results.
Q: My water is clear, but my ice has black dots. Why?
A: This usually points to the Ice Maker Assembly itself. The non-stick coating on the mold tray is likely peeling, or there is grease leaking from the motor arm. Both require replacing the ice maker unit, not the water filter.
Q: What if I see white flakes instead of black specks?
A: White flakes are usually Calcium Carbonate (scale) from hard water. As water freezes, minerals separate and form flakes. This indicates you may need a home water softener, as fridge filters do not remove dissolved minerals.


