

Modern refrigerators are not completely silent appliances; they naturally hum, cycle on and off, drop ice cubes into bins, and occasionally gurgle as refrigerant gas equalizes. However, if your serene kitchen suddenly sounds like an active construction zone, your appliance is desperately trying to warn you of an impending mechanical failure.
💡 Mentor’s Fast Advice
If your noisy refrigerator is also suffering from severe temperature issues, massive water leaks, or a completely dead compressor, you may need a broader diagnostic approach. For a complete, overarching masterclass covering all major hardware failures, check out our main troubleshooting hub.
Before you panic and assume you need to buy a brand new $2,000 appliance, take a breath. The vast majority of strange acoustic signatures—from aggressive grinding and high-pitched squealing to rapid clicking and loud buzzing—are easily traceable to specific, cheap, and easily replaceable components. In this guide, we are going to teach you how to definitively identify the exact source of the noise and confidently silence it forever.
⚠️ Safety Warning:Always physically unplug your refrigerator from the wall outlet before removing any interior plastic panels, touching moving fan blades, or exposing internal wiring.
1. Identify the Type of Noise
Different noises indicate entirely different hardware issues. A low, consistent humming is usually perfectly normal, representing the compressor actively pushing Freon through the sealed system. However, loud buzzing, rhythmic clicking, severe rattling, or high-pitched grinding can strictly signal an active problem that needs immediate intervention before it cascades into a total system failure.
Your absolute first step is to listen carefully to determine exactly where the noise is originating. The physical location tells you exactly which component is failing:
- Inside the Freezer: Almost universally an evaporator fan issue.
- Underneath the Fridge: Typically points to a dirty condenser fan, a loose drip pan, or an unlevel chassis.
- Bottom Rear (Back Wall): Usually involves the massive compressor, a shattered start relay, or a failing dual water inlet valve buzzing violently.
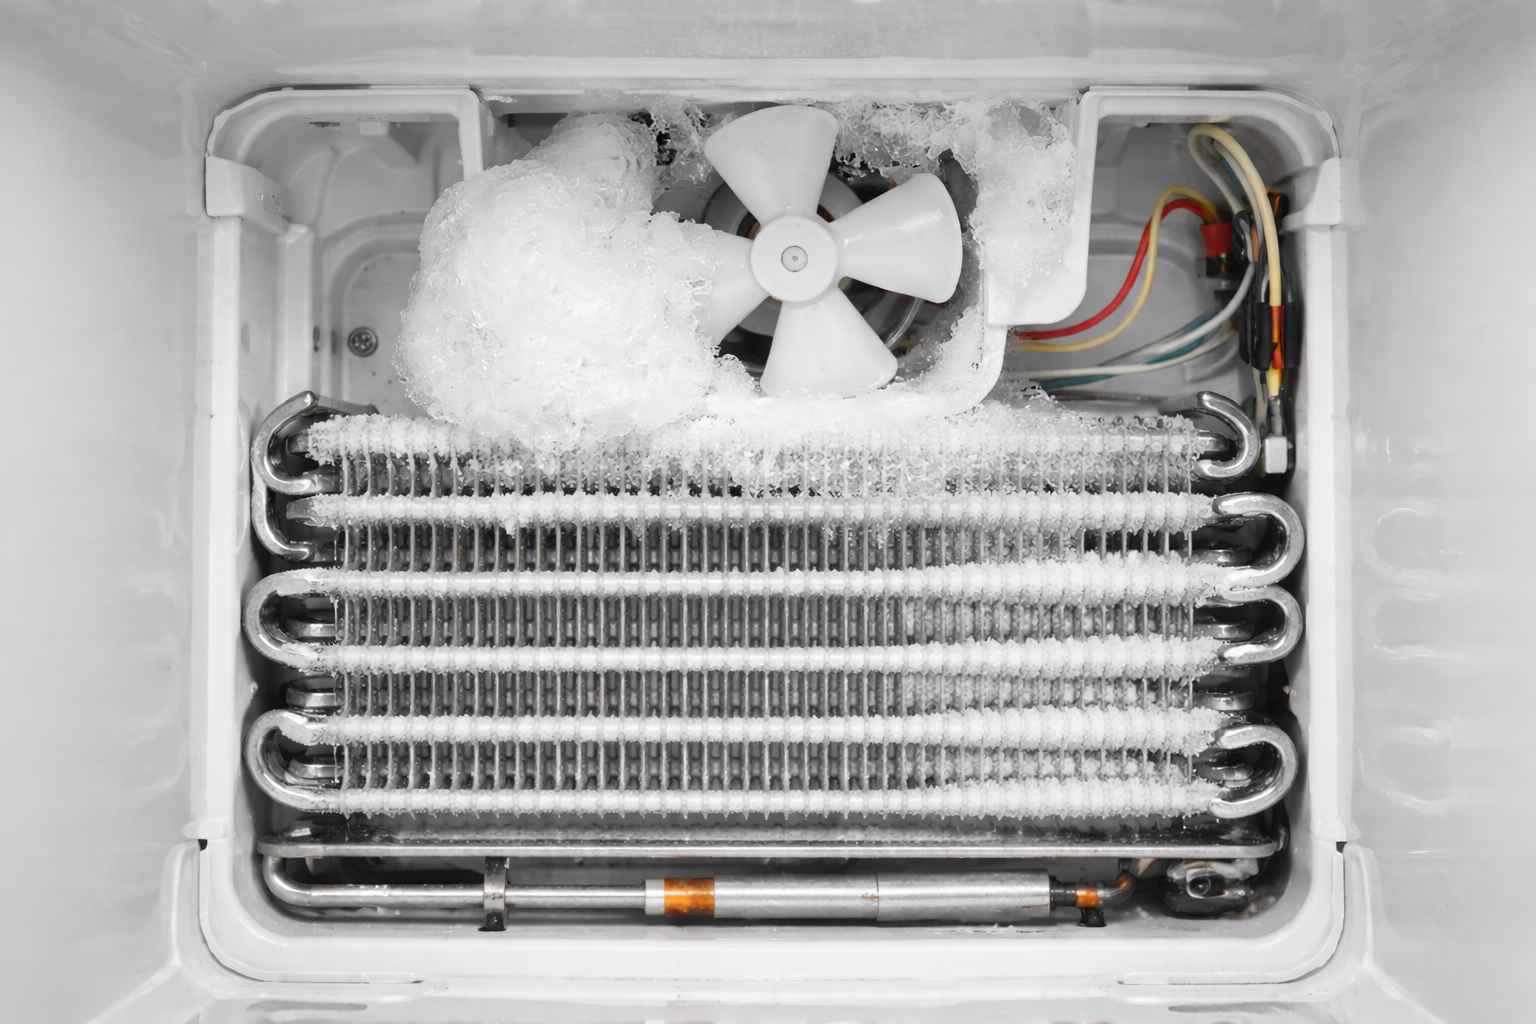
2. Check the Evaporator Fan
The evaporator fan is a highly crucial, small DC motor located directly behind the plastic back wall inside your freezer compartment. Its sole, vital purpose is to actively circulate the freezing cold air generated by the evaporator coils and physically push it down into the fresh food refrigerator cabin.
The Symptoms: If this fan is physically obstructed by severe ice or food debris, or if the internal metal bearings dry out, it will make terrifying rattling, scraping, squealing, or buzzing sounds. A telltale sign that this is your problem is if the terrifying noise instantly stops the exact second you open the freezer door (because opening the door triggers a micro-switch that cuts power to the fan).
The Fix: You must manually push the door switch in to force the fan to run while you listen. If it is grinding heavily, unplug the fridge, unpack the freezer, and unscrew the back plastic panel. If the delicate plastic fan blades are actively hitting a massive wall of solid white ice, you must safely defrost the freezer using a hairdryer and remove any obstructions. If the motor itself is completely seized, replace the fan.
3. Inspect the Condenser Fan
The condenser fan is located entirely outside the cooled cabin, usually at the absolute bottom rear of the refrigerator, sitting directly next to the massive black compressor tank. Its job is to actively pull cooler room air across the hot condenser coils to prevent the entire machine from overheating.
The Symptoms: Because this fan is located directly on the floor, it is incredibly susceptible to sucking in massive amounts of debris. If it is incredibly dirty, physically misaligned, or the blades are damaged, it can produce incredibly loud humming, intense vibration, or a rhythmic “slapping” noise.
The Fix: Pull the refrigerator firmly away from the wall and remove the lower cardboard or metal access panel. Shine a bright flashlight directly onto the fan assembly. Often, you will find large plastic grocery bags, massive clumps of pet hair, or rogue pieces of cardboard actively caught in the spinning blades. Carefully remove any obstructions and aggressively clean the fan blades with a damp cloth or a long, flexible coil cleaning brush. Ensure it spins perfectly freely. If the blade is cracked, replace the fan assembly entirely.
4. Examine the Compressor
The compressor is the literal heart of the refrigeration sealed system. It is the large, black, dome-shaped metal tank sitting at the bottom rear of the unit. It operates under immense pressure and extreme heat.
The Symptoms: A steady, low hum is normal. However, if you hear an aggressive, incredibly loud buzzing that shakes the floor, or a highly rhythmic, repetitive “Click… Buzz… Click” every three to five minutes, the compressor is in severe distress. This specific clicking noise indicates the compressor is trying to start, but is pulling too many amps and instantly tripping the thermal overload protector to prevent an electrical fire.
The Fix: The rapid clicking is very rarely the expensive compressor itself; it is almost always the cheap electrical “Start Relay” attached to the side of the compressor tank. Unplug the fridge, pop the small plastic relay off the side of the compressor, and shake it. If it rattles like a broken lightbulb, the ceramic disc inside is shattered. Use your digital multimeter to test for continuity, and if it fails, order a Universal Compressor Start Relay Kit. Persistent humming or clicking after a relay replacement usually requires professional repair.
5. Check for Loose Parts
Sometimes, the terrifying noise has absolutely nothing to do with expensive electrical motors failing, and everything to do with basic physical resonance. Refrigerators naturally vibrate when the compressor kicks on. If any surrounding components are loose, that micro-vibration is aggressively amplified into a loud, highly annoying rattle.
The Fix: Inspect both the interior and exterior of the fridge. Inside, ensure that all glass shelves are securely locked into their tracks and that the crisper drawers are fully seated. If you have glass jars touching each other, they will loudly clink together during a cooling cycle. Underneath the fridge, check the plastic defrost drip pan. If this pan has physically slipped out of its mounting brackets, it will violently rattle directly against the hot metal compressor casing. Reposition and tighten any loose components you find.
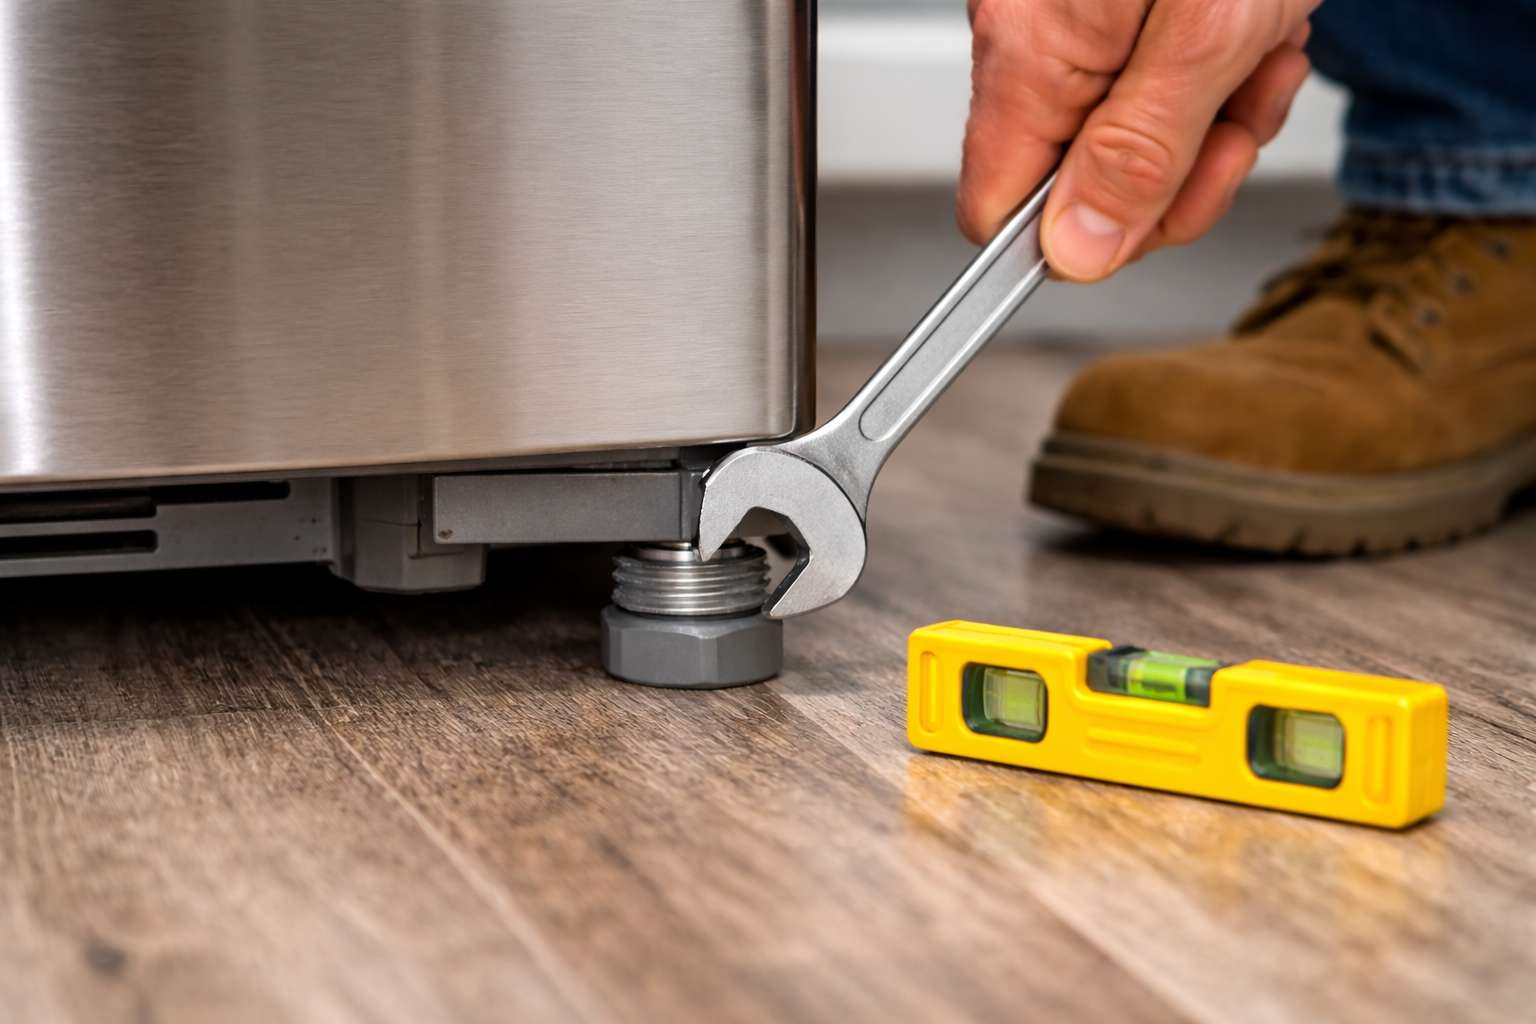
6. Level the Refrigerator
A completely unlevel refrigerator is a highly common, frequently overlooked cause of severe vibration and rattling sounds. If the heavy appliance is leaning too far forward, or if only three of the four legs are actually touching the kitchen floor, the immense torque of the heavy compressor starting up will cause the entire metal chassis to aggressively twist and vibrate against the floorboards.
The Fix: Use a standard bubble level to check the alignment of the fridge. It should be perfectly level from side to side, and actually tilted very slightly backwards (about a quarter of an inch) to ensure the heavy doors naturally swing shut on their own. Use a crescent wrench to actively adjust the hexagonal front leveling legs or rollers at the bottom front corners of the unit until it sits perfectly evenly and firmly on the floor without any rocking.
7. Reduce Vibration from Surroundings
Finally, the noise might not actually be coming from the refrigerator itself, but rather from what the refrigerator is physically touching. If your appliance was pushed too aggressively into its alcove, the vibrating metal side panels may be resting directly against your expensive wooden kitchen cabinets, or the rear coils may be physically knocking against the drywall.
The Fix: Ensure the fridge is not actively touching cabinets, the back wall, or overhead trim, which can massively amplify normal operational hums into a roaring resonance. Move the unit slightly forward and center it in its alcove to ensure a minimum 1-inch clearance on all sides. This not only instantly stops the rattling, but significantly improves vital airflow to the condenser coils.
Conclusion
A noisy refrigerator is certainly alarming, but it rarely signals the complete death of the appliance. Most aggressive refrigerator noises can be successfully and cheaply resolved by a homeowner simply by methodically checking the interior evaporator fan for encroaching ice, inspecting the bottom condenser fan for physical debris, securely tightening loose drip pans, and ensuring the heavy chassis is perfectly level. Persistent or highly unusual grinding sounds that remain after these basic checks may require professional diagnostic attention.


