

There is a specific kind of dread that hits when you reach for the milk and realize the inside of your refrigerator is barely cooler than your kitchen counter. Panic sets in, followed quickly by the fear of a massive grocery bill to replace spoiled food, and an even larger invoice from an appliance repair technician.
💡 Mentor’s Fast Advice
If your refrigerator is suffering from multiple compounding issues—such as massive water leaks, violent grinding noises, or severe airflow blockage—you may need a broader approach. For a complete, overarching masterclass covering all major hardware failures and step-by-step DIY repairs, see our main pillar guide.
Before you blindly start tearing off back panels or immediately ordering expensive replacement parts on a whim, you must establish a scientific baseline. Refrigerators are complex machines, but their failures are highly predictable. The vast majority of cooling issues boil down to three things: a lack of airflow, a failed defrost cycle, or a dead compressor.
In this guide, we will walk you through exactly how to safely diagnose refrigerator problems step-by-step, isolating the exact broken component so you only fix what is actually broken.
⚠️ Safety Warning:Always physically unplug your refrigerator from the wall outlet before removing any interior plastic panels, touching the compressor, or exposing internal wiring. Never attempt to handle a live electrical circuit.
Step 1: The “Is It Actually Broken?” Baseline Checks
Professional technicians charge $150 just to walk through your door, and you would be shocked at how often the “repair” takes less than two minutes. Before getting out your tools, completely rule out user error.
- Check the Thermostat: Did a bulky box of food accidentally bump the digital temperature dial inside the fridge? Ensure the fresh food section is set exactly to 37°F (3°C) and the freezer is set to 0°F (-18°C).
- Check the Vents: Look at the back plastic wall inside the fresh food cabin. You will see several slatted air vents. If you have a massive bag of bread or a tall milk jug shoved tightly against these vents, the cold air from the freezer cannot circulate. Clear a 2-inch gap around all vents immediately.
- The Door Gasket Test: Close a dollar bill halfway in the door and pull it out. If it slides out with zero magnetic resistance, your heavy rubber door gasket has failed, allowing warm kitchen air to constantly seep in and completely overwhelm the cooling system.
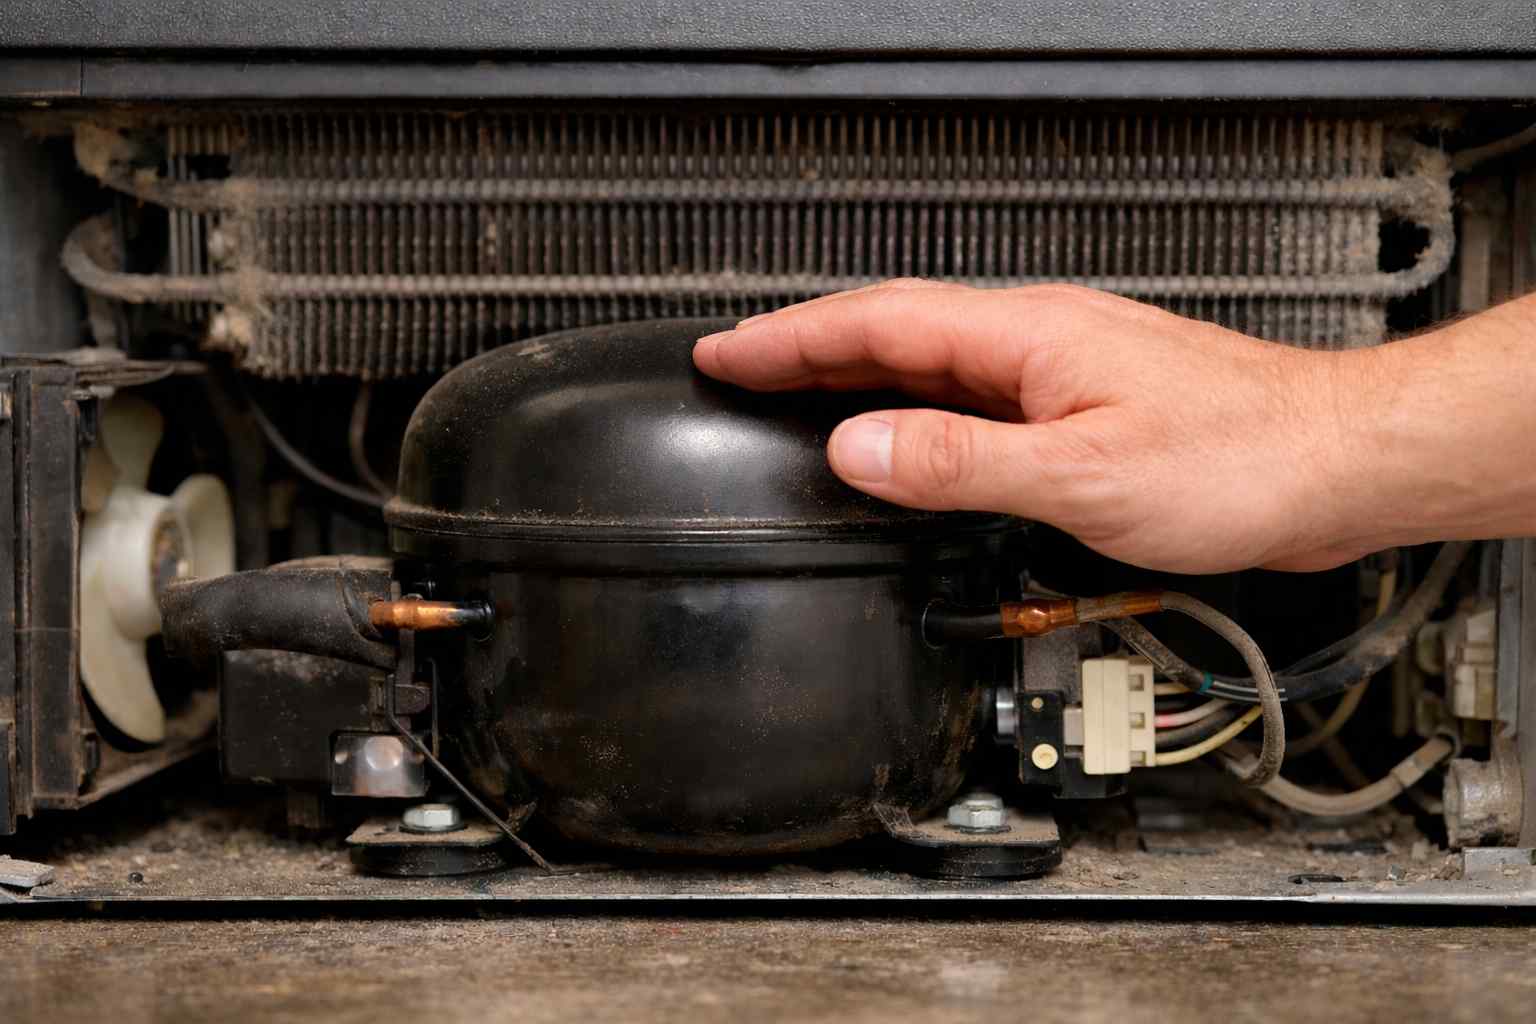
Step 2: Listen to the Compressor (The Heartbeat)
If the settings are correct and the vents are clear, pull the entire refrigerator firmly away from the wall. Remove the cardboard or metal access panel at the absolute bottom rear of the machine.
You are looking for the massive, black, dome-shaped tank. This is the compressor. It forcefully pumps Freon gas through the cooling lines. Listen closely and cautiously touch the top of the black tank (be careful, it can be very hot).
- If it is dead silent and freezing cold: The compressor is not receiving electricity. This almost always points to a burnt-out electrical start relay attached to the side of the compressor, or a dead main control board. (You can verify a bad relay by pulling it off and shaking it; if it loudly rattles like a broken lightbulb, it is shattered).
- If you hear a “Click… Buzz… Click” every 3 minutes: The start relay is actively trying to turn the compressor motor on, but failing. The overload protector clicks to shut it down before it catches fire. You must replace the start relay.
- If it is humming smoothly and hot to the touch: The compressor is working perfectly fine. Your cooling issue is elsewhere (move to Step 3).
Step 3: Inspect the Condenser Coils
While you are looking at the back of the fridge (or underneath the front kickplate), inspect the condenser coils. These are the massive winding metal grilles responsible for dissipating heat.
If these coils are completely smothered in a thick, gray blanket of pet hair, dust, and cooking grease, the refrigerator cannot physically release heat. It will suffocate, causing the compressor to violently overheat and drastically lower cooling performance inside the cabin. Aggressively vacuum and brush these coils completely clean using a long, flexible coil cleaning brush.
Step 4: Check for a Defrost System Failure
If the compressor is humming and the coils are clean, but your fresh food section is incredibly warm (while the freezer is still perfectly freezing ice cream), you likely have a catastrophic defrost failure.
Open your freezer and look at the back plastic wall. Do you see thick, white frost visibly building up heavily on the plastic itself? If so, the hidden defrost heater has burned out. Because it cannot melt the daily frost, a massive, impenetrable wall of solid ice has built up over the internal evaporator coils. This solid ice block completely traps the cold air inside the freezer, preventing the internal fan from blowing it up into the refrigerator section.
How to Diagnose: You must unplug the fridge, empty the freezer, remove the back interior panel, and use a Digital Multimeter to test the glass or metal defrost heater tube for “continuity” (an unbroken electrical path). If the multimeter reads “OL” (Open Loop), the heater is dead and must be replaced.
Step 5: Test the Evaporator Fan Motor
The final highly common culprit is the evaporator fan. This small fan sits inside the freezer, directly above the freezing coils. Its sole job is to physically push the freezing air throughout the entire appliance.
How to Diagnose: Open the freezer door. Manually push in the door light switch with your finger to trick the fridge into thinking the door is closed. Listen closely to the back wall. You should instantly hear a smooth, whirring fan spin up, and you should feel cold air blowing in your face.
- If you hear an aggressive grinding or scraping noise, the plastic fan blades are actively hitting encroaching ice buildup, or the internal motor bearings are completely destroyed.
- If it is dead silent and you feel absolutely zero airflow, the fan motor has entirely burned out and must be replaced. Without this fan, the cold air simply sinks to the bottom of the freezer and stagnates.

Conclusion
Diagnosing a broken refrigerator might seem intimidating at first glance, but by methodically checking the “Big Three” systems—airflow, the defrost cycle, and the compressor—you can easily pinpoint the exact cause of the failure without blindly throwing parts at the problem.
Remember to always prioritize your personal safety by unplugging the unit before testing any internal components with your multimeter. Even if you ultimately determine that the repair requires an EPA-certified professional (like a completely seized compressor or a sealed Freon leak), walking into that service call with a firm baseline diagnosis will save you from dishonest upcharges and unnecessary diagnostic fees. Start with the easiest fixes first—clear those vents, aggressively clean your condenser coils, test your start relay, and get your kitchen running smoothly again!


