

It usually starts as a minor annoyance: you pull your glass away, and a second later, a single drop falls onto the drip tray. But over a few weeks, that single drop turns into a steady, rhythmic drip. Before you know it, you are constantly wiping up a hard-water stained puddle, and your refrigerator water dispenser drips after use constantly.
While a dripping dispenser might seem like a complex plumbing disaster waiting to happen, the reality is usually much simpler. The refrigeration system is essentially a closed loop holding pressurized water. When that water doesn’t stop flowing, it means pressure is trapped in the line, or the mechanical “gate” holding the water back has failed.
This specific dripping issue is incredibly common in Whirlpool and KitchenAid refrigerators due to the specific dual-solenoid water valves they use. In this guide, we will walk you through the three phases of diagnosing the drip, how to purge trapped air, and the exact step-by-step whirlpool water valve replacement needed to fix a failing valve permanently.
Phase 1: The “Trapped Air” Diagnosis
Before you pull the refrigerator away from the wall or buy any replacement parts, we need to rule out the easiest and most common culprit: trapped air in the water lines.
Air is compressible; water is not. If there is an air pocket trapped inside your internal water tubing or inside your water filter, that air compresses like a spring when the water pressure kicks on. When you release the dispenser paddle, the water valve shuts off, but that compressed air slowly expands, pushing the remaining water out of the nozzle.
Note: If you have air in your water lines, you will often hear strange sounds coming from the back of the appliance. If you are hearing other weird noises, check out our guide on Why Is My Refrigerator Gurgling or Hissing? to see if it’s related to the water system.
The Fix: The 3-Minute System Purge
If you recently replaced your refrigerator water filter, or if the water sputtering out of your dispenser looks cloudy and full of tiny bubbles, trapped air is your culprit.
- Grab a large pitcher or mixing bowl.
- Press the container against the dispenser paddle and hold it for 5 straight seconds.
- Release the paddle and wait 5 seconds.
- Repeat this “stop-and-go” pulsing process until you have dispensed roughly 3 gallons of water.
This pulsing action forces the trapped air pockets through the lines and out the nozzle. If the dripping stops after this purge, your problem is solved!
Phase 2: The Water Filter Check
If purging the air didn’t work, the next step in our leaky water dispenser nozzle fix is checking the water filter housing.
The water filter is seated inside a manifold that uses small rubber O-rings to create a watertight seal. If you are using a cheap, off-brand counterfeit filter, or if the O-rings on your filter are torn, water can bypass the seal. This creates a slow pressure leak that eventually trickles out of your dispenser nozzle.
- The Test: Remove the water filter entirely. Install the plastic “bypass plug” that came with your refrigerator (if your model requires one to run without a filter).
- The Result: Dispense a few cups of water and wait. If the dripping completely stops, your water filter was defective or the O-rings were compromised. Purchase a high-quality OEM filter and reinstall it.
Phase 3: The Failing Water Inlet Valve (Whirlpool & KitchenAid)
If you have flushed the lines and checked the filter, but the dispenser still drips, you are dealing with a mechanical failure. 80% of the time, the fault lies with the primary Water Inlet Valve located at the bottom rear of your refrigerator.
How the Valve Fails
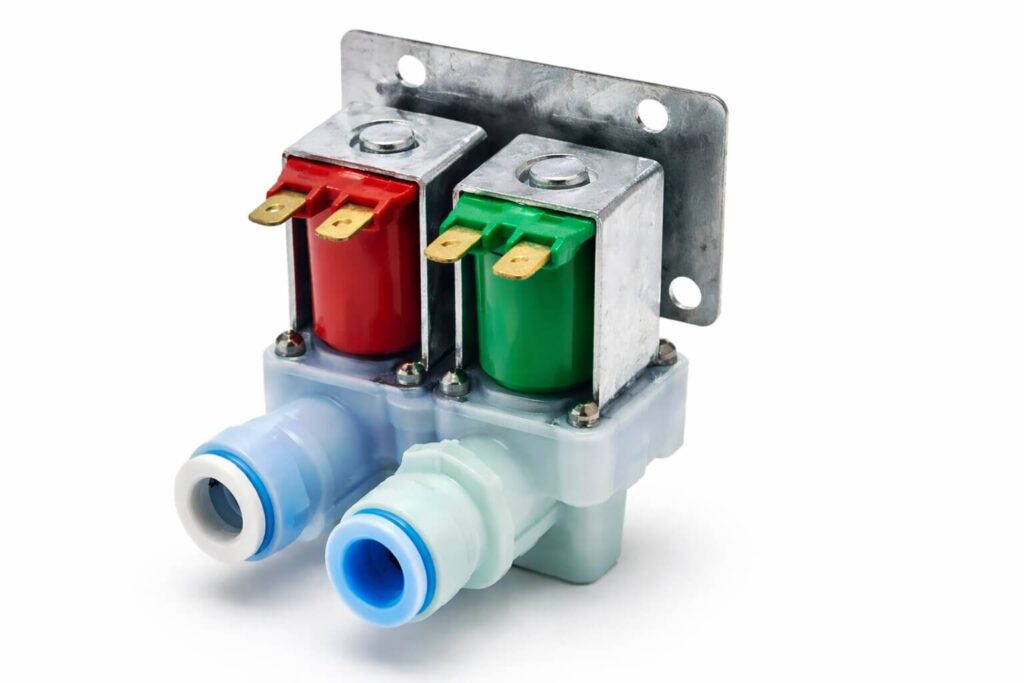
The water inlet valve is an electromechanical device. When you press the dispenser paddle, an electrical signal tells a solenoid coil on the valve to magnetically pull a small plunger open, allowing water to rush in. When you release the paddle, a spring pushes the plunger back down, and a rubber diaphragm seals the hole shut.
Over time—especially in homes with hard water or calcium buildup—that rubber diaphragm becomes stiff, tears, or gets jammed with mineral deposits. When it fails to close 100%, water slowly seeps past the seal, travels up the tubing, and drips out of your dispenser. (Additionally, if the solenoid coil itself is failing, it may vibrate. If you hear a loud buzzing, read our guide on Why Is My Refrigerator So Loud? for more valve troubleshooting).
The Solution: Valve Replacement
You cannot repair a failing water inlet valve; you must replace it. Fortunately, a Whirlpool water valve replacement is one of the easiest and most affordable DIY appliance repairs you can do.
🛠️ Recommended Replacement Part:
OEM Dual Water Inlet Valve (For Whirlpool, KitchenAid, Maytag)
Why you need this: A brand-new OEM valve guarantees a fresh, watertight rubber seal, instantly stopping the pressure leak that causes your dispenser to drip.
Step-by-Step: Whirlpool Water Valve Replacement
Safety First: Always unplug your refrigerator and turn off the water supply valve at the wall before beginning this repair.
- Access the Valve: Pull the refrigerator away from the wall. Remove the cardboard or metal lower access panel at the back of the fridge by unscrewing the 1/4-inch hex screws.
- Disconnect the Supply Line: Use an adjustable wrench to unthread the main water supply line from the valve. Have a small towel ready to catch a few drops of water.
- Remove the Valve: Use a 1/4-inch nut driver to remove the mounting screws holding the valve to the refrigerator frame. Pull the valve slightly outward.
- Disconnect Wiring and Tubing: Pull the electrical wire harnesses off the solenoid terminals. Next, remove the plastic tubing. Most modern Whirlpool valves use “John Guest” push-to-connect fittings. Simply press in on the locking collar (the ring around the tube) while pulling the tube straight out.
- Install the New Valve: Push the plastic tubing firmly into the new valve until it bottoms out (usually about 1/2 inch deep). Reconnect the wire harnesses, mount the valve back to the frame, and reattach your main water supply line.
- Test for Leaks: Turn the water supply back on and check the back of the fridge for leaks. Finally, plug the fridge in and dispense 2 gallons of water to purge any air from the new valve. The dripping should be entirely cured!
Summary: Dispenser Dripping Troubleshooting Table
| Symptom | Likely Cause | The Fix |
|---|---|---|
| Water splatters and drips after replacing filter | Trapped Air in Lines | Pulse-flush 3 gallons of water |
| Steady drip, filter is older than 6 months | Damaged Filter O-Rings | Replace with OEM water filter |
| Constant, rhythmic drip from nozzle all day | Failing Water Inlet Valve | Replace Water Inlet Valve |
Frequently Asked Questions
Is it normal for a refrigerator water dispenser to drip a little?
A very minor delay is normal. When you release the dispenser paddle, it is completely normal for 1 or 2 small drops to fall as the remaining water clears the nozzle lip. However, if it continues to drip for minutes or hours afterward, you have a pressure leak that needs to be addressed.
Can I clean the water inlet valve instead of replacing it?
It is highly discouraged. The rubber diaphragms inside the water inlet valve are ultrasonically sealed at the factory. Attempting to pry the valve apart to clean calcium deposits usually destroys the watertight seal entirely, resulting in a massive water leak behind your refrigerator that can flood your kitchen. Given how inexpensive replacement valves are, replacement is the only safe option.
Why is water leaking from the bottom of my Whirlpool fridge?
If your refrigerator water dispenser drips after use, but you also notice water pooling underneath the appliance itself, the leak is likely coming from the water valve connections at the back, or a cracked water reservoir tank inside the fresh food compartment. You should inspect the back panel immediately. If left unchecked, this excess moisture can cause the fridge to work overtime. If your compressor never shuts off, you might want to read Why Is My Refrigerator Running Constantly? to prevent further damage.


