

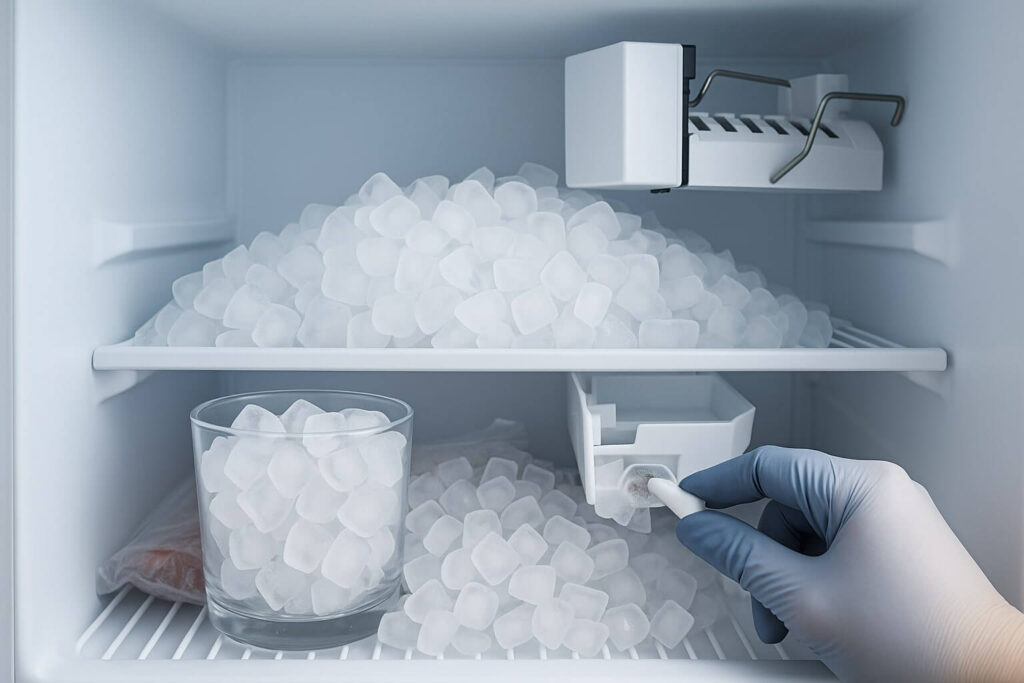
You open your freezer, reach for some ice, and instead of a neatly contained bin, you find a mountain. The bin is overflowing, ice cubes are spilling out, and sometimes they’ve even fused into a solid block, creating an icy barrier in your freezer.
If your ice maker won’t stop making ice, it’s more than just a minor annoyance. An ice maker overflowing can quickly lead to:
-
Freezer jams: Blocks of ice trapping your food.
-
Dispenser breakage: Overfilling can damage the dispenser auger motor.
-
Water leaks: When the ice melts and refreezes in weird places, it can eventually lead to refrigerator leaking water on the floor.
This problem isn’t about making ice; it’s about knowing when to stop. Your ice maker is stuck in a continuous loop, producing batch after batch without realizing the bin is full.
In this ultimate guide, we’ll troubleshoot the 4 main reasons your ice maker can’t take a break, from simple adjustments to part replacements. Let’s get your ice production under control.
The Core Problem: Why Won’t It Stop?
To fix an overflowing ice maker, you need to understand how it knows when to stop. It uses two primary mechanisms:
-
The Feeler Arm (Mechanical Ice Makers): This is a wire or plastic arm that extends into the ice bin. When ice fills the bin and pushes the arm up, it signals the ice maker to stop. When ice levels drop and the arm falls, it signals it to start again.
-
The Optical Sensor (Electronic Ice Makers): Newer, often in-door ice makers use an infrared light beam across the top of the ice bin. When ice blocks this beam, the ice maker stops. When the beam is clear, it starts.
If either of these “stop” signals fails, your ice maker will just keep producing, leading to an ice maker overflowing.
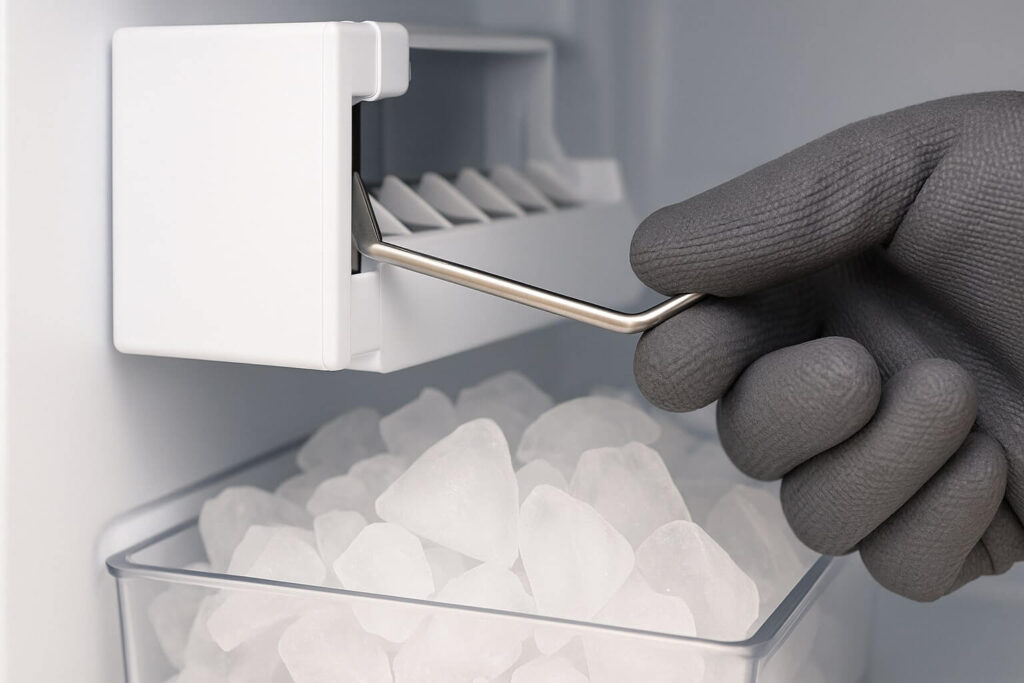
Cause #1: A Stuck Feeler Arm (The Easiest Fix)
This is the most common reason for an overflowing ice maker, especially in top-freezer and some side-by-side models.
-
The Problem: The refrigerator feeler arm (also called a “shut-off arm” or “bail arm”) is a simple piece of wire or plastic that pivots up and down. If it gets stuck in the “down” position (even when the bin is full), the ice maker never gets the signal to stop.
-
It might be caught on a piece of ice.
-
It might be frozen in place with a thin layer of frost.
-
It might be physically bent or out of its hinge.
-
-
The Symptoms:
-
The ice maker keeps making ice even when the bin is completely full.
-
You can clearly see the feeler arm is not sitting above the level of the ice.
-
How to Fix It
-
Locate the Arm: It’s a wire or plastic arm sticking out from the side of the ice maker unit, reaching into the bin.
-
Clear Obstructions: Carefully remove the ice bin. Check if any stray ice cubes are physically blocking the arm from moving up.
-
Thaw It: If the arm appears frozen, use a hairdryer on a low setting to gently warm the area around the arm’s pivot point for 1-2 minutes. Do NOT use high heat or direct flame.
-
Re-seat It: Wiggle the arm gently. Ensure it pivots freely up and down and that it is properly seated in its hinge. Some arms can be removed and re-inserted.
-
Test: Put the bin back. If the arm is correctly pushed up by the ice, the ice maker should pause.
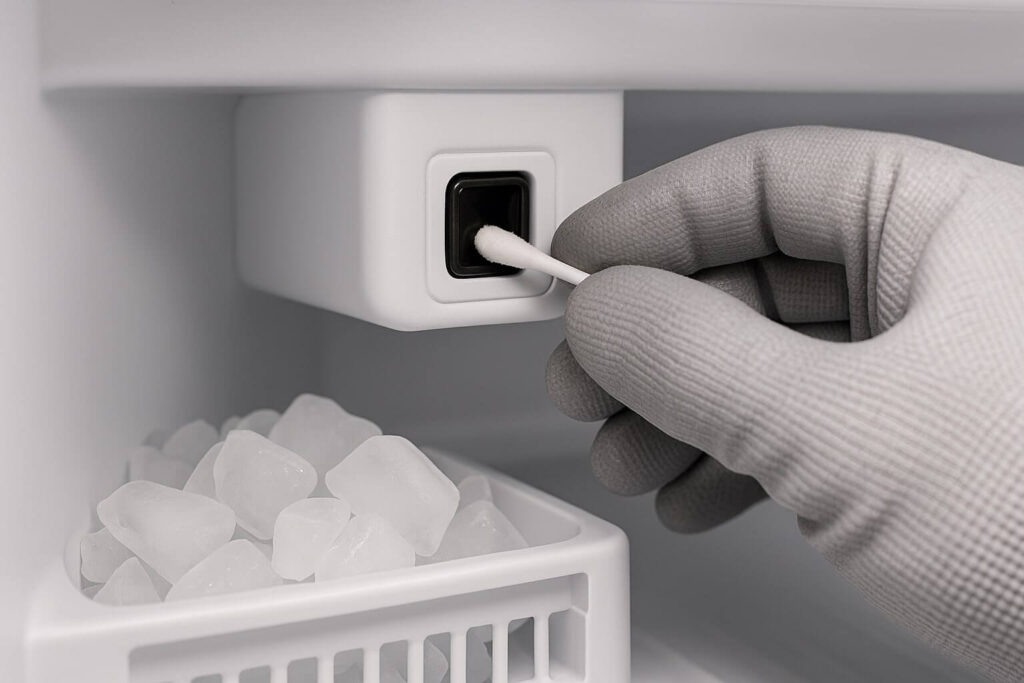
Cause #2: Faulty Optical Sensors (Electronic Ice Makers)
Newer refrigerators, especially those with in-door ice makers, often use optical sensors instead of a feeler arm.
-
The Problem: Optical sensors consist of an infrared emitter (light source) on one side of the ice bin and a receiver on the other. When ice blocks the light beam, the ice maker stops. If the beam is always clear (or the sensors are dirty), the ice maker thinks the bin is empty and keeps running.
-
Dirt/Dust: The most common issue is that the emitter or receiver lens gets covered in frost, dirt, or even a stray piece of ice.
-
Misalignment: The ice bin might not be seated properly, misaligning the sensors.
-
Failure: The sensors themselves (either the emitter or receiver) can fail electronically.
-
-
The Symptoms:
-
Your ice maker runs constantly, but there is no feeler arm.
-
The ice bin is clearly full, but the ice maker keeps dropping cubes.
-
How to Fix It
-
Remove the Ice Bin: Take out the entire ice bin.
-
Locate Sensors: Look for small, dark “eyes” or “windows” on the inside walls of the freezer, usually at the top of where the ice bin sits.
-
Clean Thoroughly: Use a soft, dry cloth or a cotton swab to gently clean both the emitter and receiver lenses. Ensure there is no frost, dirt, or lint.
-
Re-seat Bin: Put the ice bin back in, making sure it slides fully into place. If the bin is even slightly ajar, it can break the light beam.
-
Test: Give it time. If the sensors are clean and aligned, the ice maker should now correctly detect the full bin. If not, one of the sensors may have failed.
Cause #3: A Faulty Ice Maker Control Module/Thermostat
The “brain” of the ice maker tells it when to start and stop, and when the ice is frozen solid.
-
The Problem (Thermostat): Inside the ice maker assembly is a small thermostat (or thermistor). It senses when the ice in the mold is frozen solid. If this thermostat fails, the ice maker might not realize the cubes are ready, leading to longer freeze times or erratic cycling.
-
The Problem (Control Module): The main control module orchestrates the entire cycle: fill, freeze, eject, sense. If this module fails, it can send constant “fill” signals or ignore the “stop” signals from the feeler arm/optical sensors.
-
The Symptoms:
-
The ice maker doesn’t seem to stop even after troubleshooting the feeler arm/sensors.
-
The ice cubes might be too frozen, very hard, or taking a long time to eject.
-
The ice maker might cycle randomly.
-
How to Fix It
-
Reset the Ice Maker: Unplug the refrigerator for 5 minutes. This can sometimes reset the control module.
-
Inspect (Advanced): This is a more involved repair. You’ll need to remove the entire ice maker assembly from the freezer wall.
-
Replace the Module/Thermostat: Depending on your model, you might be able to replace just the thermostat or the entire ice maker control module. For most modern units, replacing the entire ice maker assembly is the easiest solution as these components are integrated.

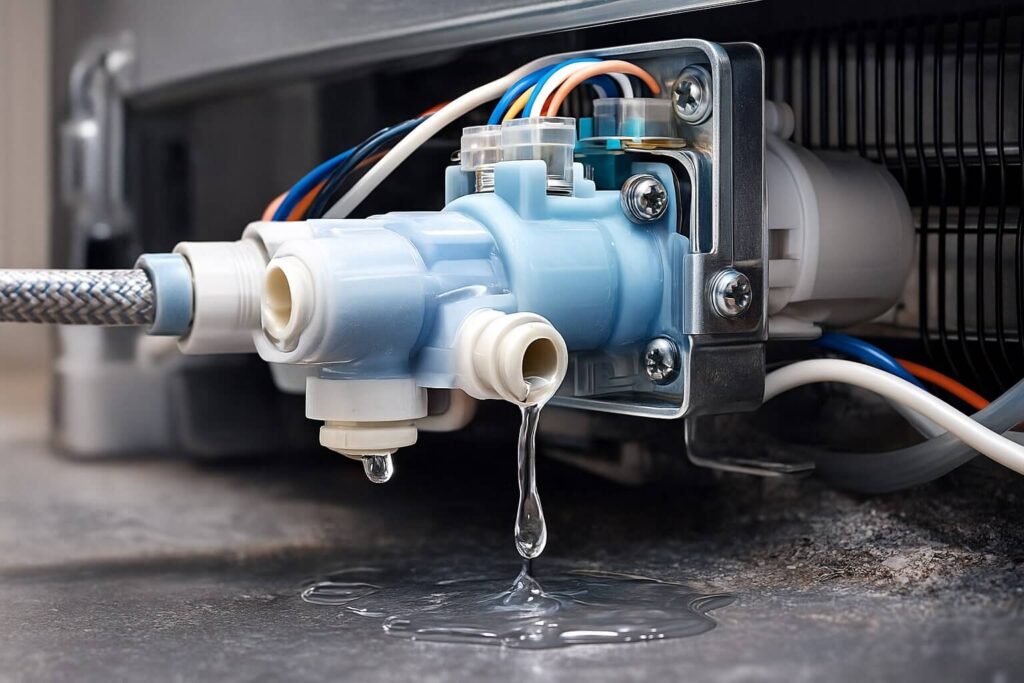
Cause #4: A Stuck Open Water Inlet Valve
This is a serious problem that requires immediate attention, as it can lead to flooding.
-
The Problem: The water inlet valve on the back of your refrigerator is an electronic solenoid valve. It’s supposed to snap open when the ice maker calls for water and snap closed immediately after the fill cycle. If the valve gets stuck in the open position, it will continuously trickle water into the ice mold, causing the ice maker to overflow with water and ice.
-
This is often due to mineral deposits, debris, or a faulty solenoid.
-
-
The Symptoms:
-
The ice maker overflows with both water and ice, even when the power arm/sensor is activated.
-
You might hear a constant, faint “hissing” or “dripping” sound from the back of the fridge.
-
You might notice refrigerator leaking water on the floor (if the overflow makes its way out of the freezer).
-
How to Fix It
-
Immediate Action: Turn off the water supply to the refrigerator immediately! This is usually a small shut-off valve behind the fridge or under your kitchen sink.
-
Unplug the fridge.
-
Replace the Valve: A stuck-open water inlet valve cannot be repaired; it must be replaced. This involves:
-
Removing the back access panel of the fridge.
-
Disconnecting the water line and electrical harness.
-
Installing a new refrigerator water inlet valve.
-
Cause #5: Your Freezer is Too Warm (Not Cold Enough)
This might seem counter-intuitive, but a warmer freezer can trick your ice maker.
-
The Problem: Ice makers are designed to operate within a specific temperature range (typically 0-5°F). If your freezer temperature is too warm (above 10-15°F), the ice cubes take much longer to freeze solid.
-
This means the ice maker’s internal thermostat or optical sensor takes longer to register that the ice is “done” and ready for ejection.
-
In some cases, the ice maker might cycle prematurely (thinking the ice is frozen when it’s not fully solid), leading to ice maker small cubes, or it might delay ejection, allowing more water to drip in.
-
A constantly running ice maker could simply be trying to finish a batch that won’t freeze properly.
-
-
The Symptoms:
-
Soft, slushy, or partially frozen ice cubes.
-
Foods in your freezer seem warmer than they should be.
-
The ice maker cycles frequently but never seems to complete a full batch correctly.
-
How to Fix It
-
Check Freezer Temperature: Place a reliable thermometer in your freezer. It should read between 0°F and 5°F (-18°C and -15°C).
-
Adjust Settings: Ensure your freezer thermostat is set to the coldest recommended setting.
-
Inspect Door Seals: Check if the freezer door seals are tight. A torn or loose seal allows warm air in, forcing the freezer (and ice maker) to work harder.
-
Clean Condenser Coils: If your freezer is too warm, the condenser coils (usually underneath the fridge) might be dirty, restricting airflow and making the compressor inefficient.
Frequently Asked Questions (FAQ)
-
How do I temporarily stop my ice maker from making ice? Most ice makers have a metal “feeler arm” that you can manually lift and lock into the “up” position. If it’s an electronic ice maker, there is often a physical “Off” switch on the ice maker assembly itself, or a “Ice Maker On/Off” button on your refrigerator’s control panel.
-
Is a constantly running ice maker wasting electricity? Yes. An ice maker that won’t stop running is drawing power, and if it’s overflowing, it’s inefficiently trying to freeze water that just keeps getting added. This will definitely increase your electricity bill.
-
What if my freezer is very cold, but the ice maker still overflows? If the freezer is properly cold (0-5°F), then the problem is definitely with the ice maker’s components: the feeler arm/optical sensors, the control module/thermostat, or a stuck-open water inlet valve.
-
Can I replace the ice maker assembly myself? Yes, for most models, replacing the entire ice maker assembly is a relatively simple DIY job. After unplugging the fridge and turning off the water, it usually involves removing a few screws and disconnecting a wiring harness.
Conclusion: Reclaim Your Freezer
An ice maker won’t stop making ice is a clear signal that something in its “stop” mechanism has failed.
Don’t let an ice maker overflowing turn your freezer into an icy tundra.
-
Check the Feeler Arm / Optical Sensors: The most common and easiest fixes.
-
Inspect the Control Module / Thermostat: The brains of the operation.
-
Test the Water Inlet Valve: A critical check to prevent leaks.
-
Verify Freezer Temperature: Ensure your fridge is cold enough to make ice efficiently.
By systematically troubleshooting these common culprits, you’ll restore proper ice production, prevent freezer jams, and ensure your ice maker only makes ice when you need it.


