
The Ultimate DIY Refrigerator Troubleshooting & Repair Guide

There is nothing quite as panic-inducing as walking into your kitchen and realizing your refrigerator has completely stopped cooling, is violently leaking water onto your hardwood floors, or is suddenly making a terrifying grinding noise. Before you immediately pick up the phone and agree to pay a professional appliance technician a $150 diagnostic fee just to walk through your front door, take a deep breath. The vast majority of common refrigerator failures are entirely solvable with basic household tools, a digital multimeter, and a little bit of patience. This is the ultimate, massive master diagnostic guide for homeowners. Specifically, we are going to walk you through exactly how to safely diagnose complex electrical hardware failures, test your compressor, optimize your internal airflow dynamics, silence strange grinding noises, permanently stop annoying water leaks, and verify your door seals.

💡 The DIY Repair Master Hub
This master guide is your absolute foundation for solving everyday refrigerator headaches. We have seamlessly integrated our top-rated diagnostic tutorials into this single, highly detailed resource. Scroll down and click any of the yellow highlight boxes to deep-dive into specific, step-by-step troubleshooting instructions.
1. How to Diagnose Common Refrigerator Problems
Before you start eagerly tearing off back panels, unscrewing components, and blindly ordering highly expensive replacement parts on the internet, you absolutely must establish a firm, scientific baseline diagnosis. Refrigerators, despite their modern touchscreens and Wi-Fi capabilities, are fundamentally just heavily insulated boxes that rely entirely on a highly delicate, physical balance of airflow, refrigerant gas, and automated defrost cycles.
If your refrigerator is suddenly warm, the very first, mandatory step is determining if the failure is mechanical (a physical moving part broke), electrical (a circuit board or wire burned out), or simply severe user error (like blocking a crucial air vent with a frozen turkey). Let's break down the "Big Three" systems that universally dictate whether your food stays cold or spoils.
The Big Three Failures
When an appliance completely stops cooling, a professional technician will immediately investigate these three core systems before looking at anything else:
- The Sealed System (The Compressor): The massive, heavy black tank sitting at the absolute bottom rear of your refrigerator is the compressor. It is the literal heart of the appliance, responsible for forcefully pumping Freon gas through the coils. Pull the fridge away from the wall and listen. If that massive black tank is dead silent, perfectly still, and physically freezing cold to the touch, your unit has suffered a catastrophic electrical start-relay failure or the compressor itself has mechanically seized.
- The Defrost System (The Heaters): Frost naturally accumulates on the freezing coils inside your freezer. To prevent this frost from building up, a heating element turns on multiple times a day to actively melt it. If your freezer is perfectly freezing ice cream at 0 degrees, but the fresh food section above it is a sweltering 60 degrees, your defrost heater has likely failed. A massive, impenetrable wall of solid ice has built up completely over the evaporator coils, entirely blocking the cold air from transferring into the fridge cabin.
- The Airflow System (The Fans): Your refrigerator utilizes two highly critical fans. The Condenser Fan sits next to the compressor to cool it down. The Evaporator Fan sits inside the freezer to physically push the cold air throughout the cabin. If you open the freezer door, press the door switch in, and cannot actively hear or feel the evaporator fan vigorously blowing freezing air directly into your face, the cold air is effectively trapped. Without the fan, the air simply stagnates and the entire unit will feel warm.
2. Mastering the Multimeter: The Ultimate DIY Tool
You cannot successfully perform advanced appliance repair by simply guessing. To prove a specific component has actually failed, you must test its electrical properties. The most vital, absolutely non-negotiable tool in your DIY arsenal is a Digital Multimeter. If you do not own one, you must purchase one before proceeding to test internal components.
Testing for Continuity (The “Beep” Test)
The most common test you will perform is a "Continuity Test." Continuity simply means there is a completely unbroken, continuous electrical path for electricity to flow through a part. If a heating element burns out, the internal wire breaks, meaning it lacks continuity. The part is "open" and dead.
- Safety First: Absolutely always entirely unplug the refrigerator from the wall outlet before touching any wires or internal components. Never test for continuity on a live, powered circuit.
- Set the Dial: Turn the main dial on your digital multimeter to the "Continuity" setting (it usually looks like a small WiFi or sound wave symbol, or a diode symbol).
- Test the Probes: Touch the red metal probe directly to the black metal probe. The multimeter should instantly beep loudly and display a number very close to zero (e.g., 0.001). This proves your meter is working.
- Test the Component: Remove the part you wish to test (like a defrost heater element or a thermal fuse). Touch one probe to one metal terminal, and the other probe to the opposite terminal.
- Read the Results: If the multimeter beeps loudly, the component has continuity and is generally electrically healthy. If the screen displays "OL" (Open Loop) or "1" and remains completely silent, the internal wire has burned out and the part is definitively broken and must be replaced.
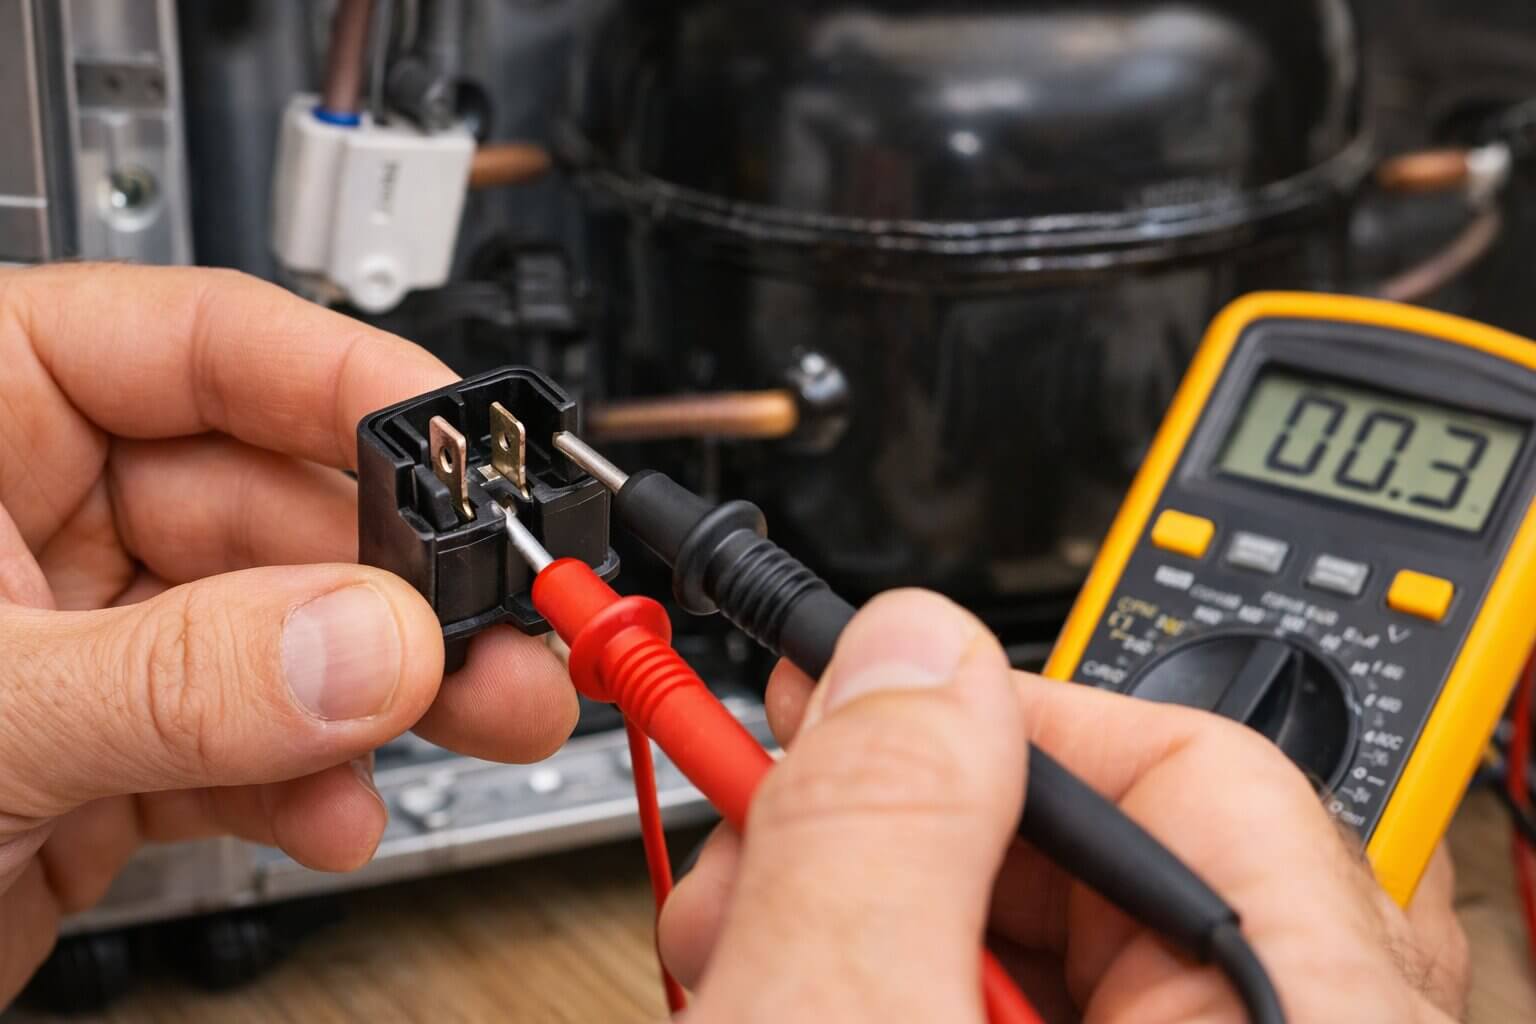
Testing the Compressor Start Relay
The start relay is a small plastic box attached to the side of the massive black compressor. It gives the compressor a massive jolt of electricity to start the motor. If your fridge is warm and you hear a "click-buzz-click" noise every 5 minutes, this part has failed. Unplug the fridge, pull the relay off the compressor, and gently shake it next to your ear. If it loudly rattles like a baby's rattle or a broken lightbulb, the ceramic disc inside has shattered. You can completely confirm this by testing the two pin holes with your multimeter. If you get "OL" across the pins, order a universal start relay kit immediately.
3. Silencing Strange Refrigerator Noises
Modern, high-efficiency refrigerators are absolutely not completely silent appliances; they hum, cycle, quietly drop ice into bins, and occasionally gurgle as refrigerant moves through the lines. However, if your serene kitchen suddenly sounds like an active construction zone, your appliance is desperately trying to warn you of an impending hardware failure. Identifying the exact acoustic signature of the noise is the definitive key to fixing it.
Identifying the Culprit by Location & Sound
Different mechanical parts make highly distinct sounds when their internal bearings dry out or plastic components physically break:
- Loud Buzzing or Humming (Bottom Rear): This noise is usually originating from the dual water inlet valve located at the back of the fridge. This heavily indicates the ice maker is actively trying to call for water, but the home water supply wall valve is turned off, the internal supply line is kinked, or the inlet valve itself is heavily clogged with solid calcium scale and failing to open.
- Aggressive Grinding, Scraping, or Squealing (Inside the Freezer): This is almost universally an evaporator fan issue. The highly delicate plastic fan blades are actively hitting a massive wall of encroaching ice buildup (caused by a failed defrost cycle), or the internal metal motor bearings have completely dried out, causing the shaft to wobble and violently scrape the housing. This requires opening the back freezer panel to inspect visually.
- Loud Rattling or Vibration (Under the Fridge): If the noise is coming from the absolute bottom front or rear, the condenser fan motor is likely the culprit. Sometimes, large pieces of paper, plastic bags, or massive dust bunnies get violently sucked into the condenser fan blades under the fridge, causing a massive vibration. Alternatively, the drain pan under the fridge may simply be loose and rattling against the compressor vibrations.
- Rapid Clicking (Bottom Rear): A highly distinct, rhythmic "click... buzz... click" originating directly from the bottom rear of the unit means the compressor start relay is actively failing. The overload protector is constantly tripping to prevent the compressor from catching fire.
4. Easy DIY Fixes for a Leaking Refrigerator
Finding a massive, expanding puddle of water pooling under your vegetable crisper drawers or slowly warping your expensive kitchen hardwood floors is an absolute nightmare. The immediate assumption is that a highly pressurized internal pipe has violently burst. Fortunately, the vast majority of residential refrigerator leaks have absolutely nothing to do with catastrophic, expensive plumbing failures and are incredibly easy to solve with simple DIY methods.
The Clogged Defrost Drain (The #1 Culprit)
Every single modern "frost-free" refrigerator actively utilizes an intense heating element to melt ambient frost off its internal evaporator coils multiple times a day. This rapidly melted water drops directly into a small aluminum V-shaped gutter and runs down a tiny, 1/4-inch plastic drain tube into a massive evaporation pan situated under the fridge next to the hot compressor, where it safely evaporates into the room.
However, over the span of several years, this tiny, dark drain tube becomes heavily clogged with frozen food crumbs, spilled sugary syrup, algae, and thick bacteria. When the tube physically clogs, the daily defrost water has absolutely nowhere to go. It violently overflows the shallow gutter, runs directly under your deli drawers, freezes into a massive sheet of solid ice at the bottom of the compartment, and eventually leaks violently out the front door onto your floor.
Fixing the Defrost Leak
To permanently fix this frustrating issue, you must aggressively attack the clog:
- Remove the Back Panel: Unplug the fridge, empty the freezer, and unscrew the interior back plastic wall panel to expose the silver evaporator coils.
- Thaw the Gutter: You will likely see a massive block of solid ice sitting in the aluminum gutter below the coils. Use a handheld hairdryer on a medium, warm setting (never high heat, which will violently warp the plastic liner) to patiently melt the ice block.
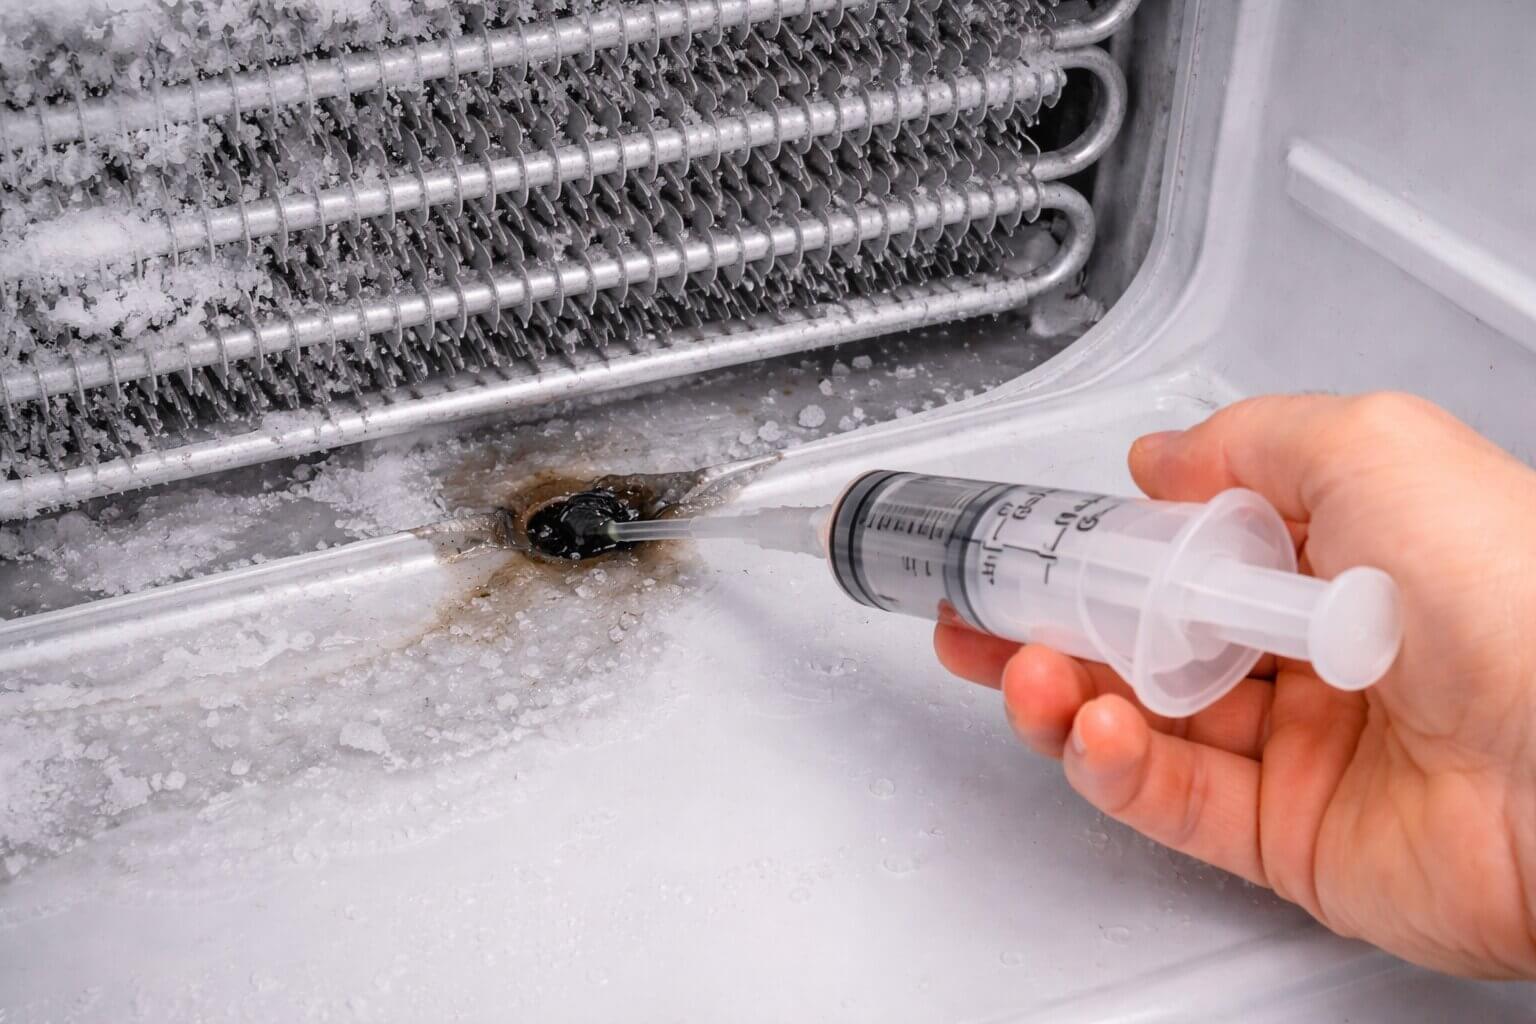
- Flush the Drain: Once the drain hole is finally visible, use a specialized, flexible plastic syringe tool filled with scalding hot water and a tablespoon of baking soda. Forcefully inject the hot water directly down the tiny drain hole to aggressively violently push the organic clog completely out into the bottom pan.
- Verify the Flow: Pour a cup of clean, warm water down the hole. If it instantly disappears with a satisfying gurgle, the massive leak is permanently fixed.
Rear Inlet Valve Leaks
If the massive puddle is entirely originating from the back of the refrigerator, the defrost drain is not to blame. Pull the fridge firmly away from the wall and intensely inspect the plastic dual water inlet valve located at the bottom right corner, where the main copper home supply line connects. Over time, extreme home water pressure can cause the plastic compression fittings on this valve to develop highly subtle hairline cracks. If you see active, persistent dripping from the solenoids or the compression nuts, you must completely shut off the wall water valve immediately and replace the entire dual inlet valve assembly. It cannot be patched with tape or glue.
5. Airflow & Temperature Optimization Tips
A highly frequent complaint among homeowners is that their milk aggressively spoils quickly on the top shelf of the fridge, while their delicate lettuce actively freezes completely solid in the bottom vegetable crisper. Your immediate thought is that the expensive compressor is entirely broken. In reality, this is almost never a mechanical failure; it is a severe, highly specific internal airflow management issue. Refrigerators rely entirely on highly precise, unrestricted air patterns and complex thermal dynamics to maintain a uniform, highly safe 37°F across the entire cabin.
Stop Blocking the Crucial Vents
Look very closely at the back plastic wall inside your fresh food refrigerator compartment. You will clearly see multiple slatted or circular air vents. The freezer compartment actually generates 100% of the freezing cold air for the entire appliance, and a small, high-speed fan physically pushes a precisely metered amount of that freezing air down through those specific vents into the fresh food section below.
If you aggressively pack your refrigerator absolutely full of large, flat pizza boxes, towering plastic milk jugs, and dense, heavy Tupperware shoved directly against that back wall, you are physically and catastrophically choking the vents. The cold air literally cannot circulate around the cabin. It drops heavily to the bottom (freezing your crispers) while the top shelves severely stagnate and warm up. You absolutely must always leave a mandatory, non-negotiable 1-inch to 2-inch physical gap between your groceries and the back wall to allow for proper thermal circulation.
The Coil Cleaning Masterclass
The single most neglected, highly destructive maintenance task in America is cleaning the condenser coils. Located either entirely underneath the refrigerator behind the front kickplate grille or on the exposed rear wall, these massive black metal coils are responsible for actively dissipating the intense heat absorbed from inside the fridge into the ambient room air.
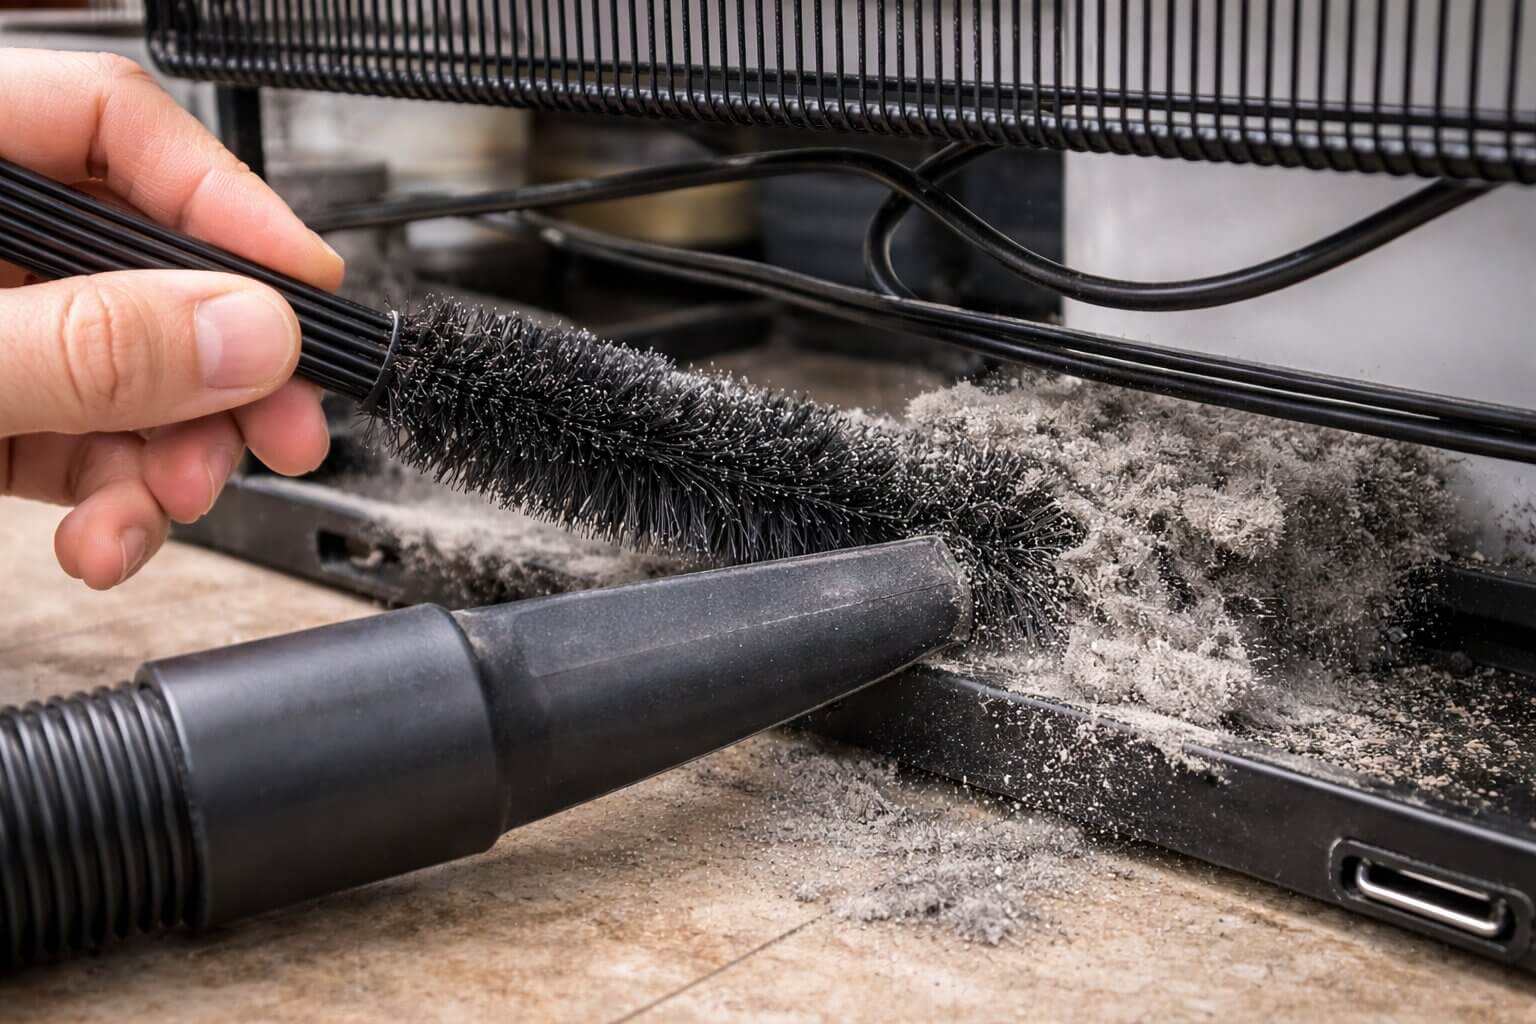
Over the span of six months, a massive, thick blanket of gray dust, sticky cooking grease, and heavy pet hair completely covers these metal coils. This dense blanket acts exactly like a heavy winter coat, aggressively trapping the heat. Because the refrigerator literally cannot physically cool down, the compressor is forced to run continuously at 100% maximum capacity, 24 hours a day, desperately trying to lower the temperature. This aggressive overworking violently overheats the compressor, drastically drives up your monthly electric bill, and will unequivocally cause the compressor to burn out years before its intended lifespan.
You must absolutely vacuum and violently brush these coils completely clean at least twice a year using a specialized, long, flexible coil brush. If you own multiple heavily shedding pets, this task is strictly mandatory every three months to prevent catastrophic thermal failure.
6. Door Gaskets & The Dollar Bill Test
If your internal airflow is completely unblocked and your condenser coils are immaculately clean, yet the refrigerator compressor is still constantly running and heavy frost is rapidly building up inside the freezer, you have a massive ambient air leak. The heavy rubber magnetic seals that run around the entire perimeter of your refrigerator doors are called "gaskets."
Over the course of thousands of door openings, aggressive tugging, and the natural drying out of the rubber compounds, these gaskets lose their highly flexible, magnetic grip. When the gasket physically fails to seal tightly against the metal cabinet frame, warm, highly humid kitchen room air constantly and aggressively seeps into the freezing appliance. This constant influx of humidity instantly condenses into thick frost over the cooling coils, massively degrading efficiency.

Performing the Dollar Bill Test
You can instantly diagnose a failing, compromised gasket using a single piece of standard paper currency.
- Get a Bill: Take a crisp, flat US dollar bill (or any suitably stiff piece of paper).
- Trap the Bill: Open the refrigerator door, place the bill halfway inside the cabin, and close the door tightly on top of it, trapping the bill perfectly between the rubber gasket and the cold metal frame.
- Pull for Friction: Grab the exposed end of the bill and pull it straight out. You should feel very strong, highly distinct physical resistance and magnetic friction holding the bill back.
- Test the Perimeter: Repeat this exact trapping and pulling test every 6 inches around the entire perimeter of the door, paying highly special attention to the bottom corners where sticky syrup spills often aggressively degrade the rubber.
- The Result: If the dollar bill effortlessly slides out at any point with zero physical resistance, or if it literally falls to the floor on its own, your gasket is totally compromised. You must purchase a brand new, OEM magnetic gasket for your specific model and massage it into the door track to stop the massive energy loss.
7. Frequently Asked Questions (FAQ)
Is it totally safe to repair my own refrigerator?
Why is there a massive sheet of solid ice under my bottom freezer drawer?
How often should I realistically clean my condenser coils to prevent failure?
Why is the wall between my fridge and freezer incredibly hot to the touch?